Other issues
How to rename interfaces in Linux
-
MAC addresses must be specified in lowercase.
-
For some OS, the configuration files use interface names like
int0/int1,ext0/ext1. The interface names must be the same in both files.
To rename interfaces, complete the following steps:
-
Create the
/etc/udev/rules.d/70-persistent-net.rulesfile if it does not exist. To do this:-
Open a terminal and launch a text editor, such as nano
-
Execute the following command with superuser rights:
sudo nano /etc/udev/rules.d/70-persistent-net.rules -
If the file does not exist, it will be created
-
-
Modify the
/etc/udev/rules.d/70-persistent-net.rulesfile as follows:SYSTEM=="net",ACTION=="add",DRIVERS=="?*",ATTR{address}=="a0:36:9f:7f:40:88",ATTR{type}=="1",NAME="int1" SUBSYSTEM=="net",ACTION=="add",DRIVERS=="?*",ATTR{address}=="a0:36:9f:57:84:94",ATTR{type}=="1",NAME="int2" SUBSYSTEM=="net",ACTION=="add",DRIVERS=="?*",ATTR{address}=="a0:36:9f:7f:40:8a",ATTR{type}=="1",NAME="ext1" SUBSYSTEM=="net",ACTION=="add",DRIVERS=="?*",ATTR{address}=="a0:36:9f:57:84:96",ATTR{type}=="1",NAME="ext2"Where:
-
int1– MAC address of NIC1 -
int2– MAC address of NIC3 -
ext1– MAC address of NIC2 -
ext2– MAC address of NIC4
-
-
In the file
/etc/default/grub, add the parametersifnames=0biosdevname=0to the lineGRUB_CMDLINE_LINUX. The line should look like this:GRUB_CMDLINE_LINUX="rd.lvm.lv=rootvg/usrlv rd.lvm.lv=rootvg/swaplv crashkernel=auto vconsole.keymap=usrd.lvm.lv=rootvg/rootlv vconsole.font=latarcyrheb-sun16 rhgb quiet net.ifnames=0 biosdevname=0" -
For Ubuntu 14, 16, and Debian 9, do not specify
biosdevname=0. Specify onlyifnames=0:GRUB_CMDLINE_LINUX_DEFAULT="net.ifnames=0" -
Recreate the grub configuration, using the following command:
-
For CentOS 7:
grub2-mkconfig -o /boot/grub2/grub.cfg -
For Ubuntu / Debian:
sudo update-grub
-
-
Reboot the server, using following command:
sudo reboot
For CentOS 6 and Ubuntu 14.04, it is not necessary to update grub. It is sufficient to specify the interface names in the file /etc/udev/rules.d/70-persistent-net.rules.
Virtual machines and support responsibilities
How to configure the network on Proxmox VE 6.4-7.4 virtual machines on dedicated servers
These instructions are suitable for Proxmox VE versions 6.4 and 7.4.
When creating a virtual machine, you need to select a bridge interface to which the virtual machine's network port will be connected to. If two network ports are required, the second one can be added via the web interface: Hardware → Add → Network device. Then, you can configure IP addresses and the gateway (GW) on the respective interfaces within the virtual machine.
For example, configure the alias IP on the interface connected to vmbr1 along with the corresponding default route, while the private IP and routes are configured on the interface connected to vmbr0.
Below are several examples of network configurations for virtual machines running Ubuntu 20.04-22.04, Debian 11, and AlmaLinux/CentOS 8 Stream.
Ubuntu 20.04-22.04
An IP address from the server's additional public network is used to configure the public network. One of the free IPs from the main private network is used for the private network. The network interface ens18 is created during the deployment of the virtual machine, while ens19 is created via the web interface and subsequently configured in the OS.
/etc/netplan/00-installer-config.yaml
# This is the network config written by 'subiquity'
network:
  ethernets:
    ens18:
      dhcp4: false
      addresses:
      - $IP/$NETMASK
      routes:
        - to: 0.0.0.0/0
          via: $PUBLIC_GW
          on-link: true
      nameservers:
        addresses:
        - $DNS_SERVERS
        - $DNS_SERVERS
    ens19:
      dhcp4: false
      addresses:
      - $PRIVATE_IP/$NETMASK
      routes:
        - to: 10.0.0.0/8
          via: $PRIVATE_GW
        - to: 192.168.0.0/16
          via: $PRIVATE_GW
        - to: 188.42.208.0/21
          via: $PRIVATE_GW
      nameservers:
        addresses:
        - $DNS_SERVERS
        - $DNS_SERVERS
  version: 2
Where:
-
$IP– any available IP address in the range assigned to the dedicated server where the virtual machine is created. This can also be an alias IP address -
$NETMASK– the subnet mask of the IP address range assigned to the dedicated server where the virtual machine is created. It can be /32 (255.255.255.255) if configuring an alias IP address -
$PRIVATE_IP– the private IP address available to the dedicated server -
$PUBLIC_GW– the IP address of the gateway in the public network -
$PRIVATE_GW– the IP address of the gateway in the private network -
$DNS_SERVERS– private or public DNS servers available to the dedicated server. For example: 192.168.8.8 and 192.168.8.88
Debian 11-12
To configure the public and private networks, IP addresses from additional public and private networks are used, respectively. The network interface ens18 is created during the deployment of the virtual machine, while ens19 is created through the web interface and subsequently configured in the OS.
Set the following network configurations in the appropriate files::
/etc/network/interfaces
source /etc/network/interfaces.d/*
# The loopback network interface
auto lo
iface lo inet loopback
/etc/network/interfaces.d/ens18
auto ens18
iface ens18 inet static
address $PUBLIC_ADDITIONAL_IP/$NETMASK
gateway $GW_OF_THE_ADDITIONAL_NETWORK
/etc/network/interfaces.d/ens19
auto ens19
iface ens19 inet static
address $PRIVATE_ADDITIONAL_IP/$NETMASK
post-up /sbin/ip route add 10.0.0.0/8 via $GW_OF_THE_ADDITIONAL_NETWORK dev ens19
post-up /sbin/ip route add 192.168.0.0/16 via $GW_OF_THE_ADDITIONAL_NETWORK dev ens19
post-up /sbin/ip route add 188.42.208.0/21 via $GW_OF_THE_ADDITIONAL_NETWORK dev ens19
Where:
-
$PUBLIC_ADDITIONAL_IP– any available public IP address of the additional network -
$PRIVATE_ADDITIONAL_IP– any available private IP address of the additional network -
$GW_OF_THE_ADDITIONAL_NETWORK– the IP address of the gateway in the additional network
Almalinux / CentOS 8 Stream
To configure the public and private networks, IP addresses from additional public and private networks are used, respectively. The network interface ens18 is created during the deployment of the virtual machine, while ens19 is created through the web interface and subsequently configured in the OS.
Set the following network configurations in the appropriate files:
/etc/sysconfig/network-scripts/ifcfg-ens18
TYPE=Ethernet
BOOTPROTO=none
DEFROUTE=yes
NAME=ens18
DEVICE=ens18
ONBOOT=yes
IPADDR=$PUBLIC_IP
NETMASK=255.255.255.248
GATEWAY=$PUBLIC_GW
ETHTOOL_OPTIONS="-K ens18 tx off tso off"
/etc/sysconfig/network-scripts/ifcfg-ens19
TYPE=Ethernet
BOOTPROTO=none
DEFROUTE=no
NAME=ens19
DEVICE=ens19
ONBOOT=yes
ETHTOOL_OPTIONS="-K ens19 tx off tso off"
IPADDR=$PRIVATE_IP
NETMASK=255.255.255.248
/etc/sysconfig/network-scripts/route-ens19
10.0.0.0/8 via $PRIVATE_GW dev ens19
192.168.0.0/16 via $PRIVATE_GW dev ens19
188.42.208.0/21 via $PRIVATE_GW dev ens19
Where:
-
$PRIVATE_IP– the private IP address available to the dedicated server -
$PUBLIC_IP– the public IP address available to the dedicated server -
$PUBLIC_GW– the IP address of the gateway in the public network -
$PRIVATE_GW– the IP address of the gateway in the private network
How to configure the network on ESXi 5.5/6.0/6.6 virtual machine on dedicated servers
Setting up and installation of virtual machines
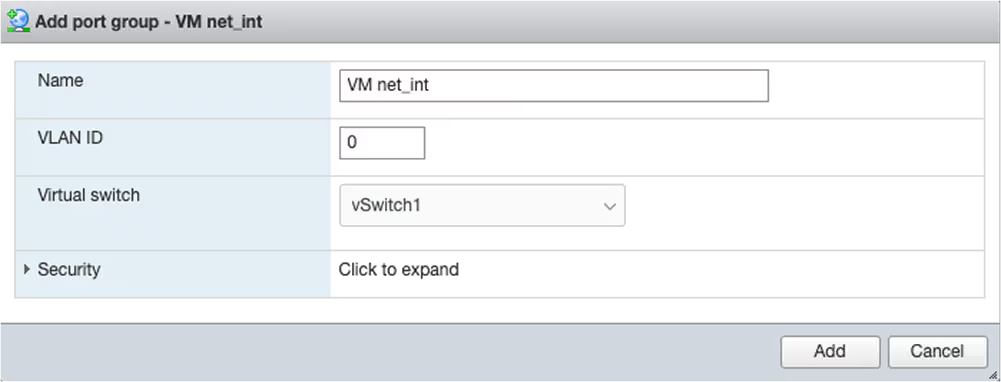
Adding a port group for a private network
A script creates only one port group: "VM Network" on vSwitch0. This port group is used for the public network on the virtual machine. If you need to set up a private network, you must add another port group on vSwitch1. To do this:
-
Click Add port group

-
Specify the Name and Virtual switch for the new port group
-
Click Add
You will get a ready port group that can be used when creating a virtual machine.
Adding images
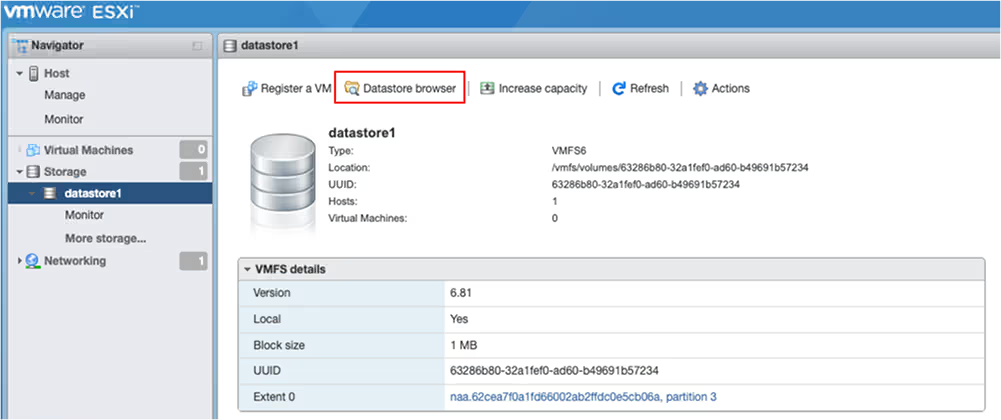
To add images for future virtual machines:
-
On the Storage page, navigate to the storage you are using and click Datastore browser
-
In the opened window, click Create directory and specify the name "images". Then, select the created directory, click Upload and choose the image to upload
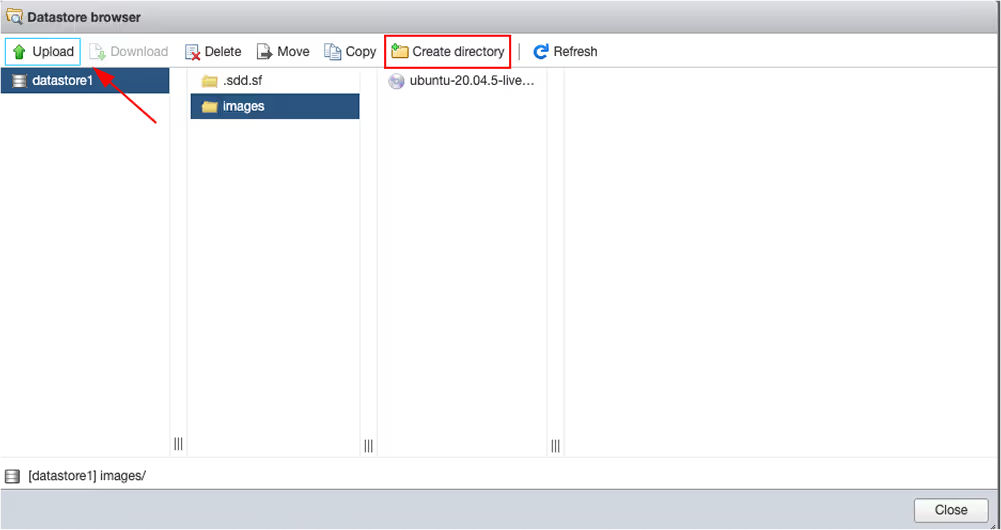
The upload process will be displayed in this window or in Recent tasks at the bottom of the page. Once the upload is complete, the image can be used to create a virtual machine.
Creating a virtual machine
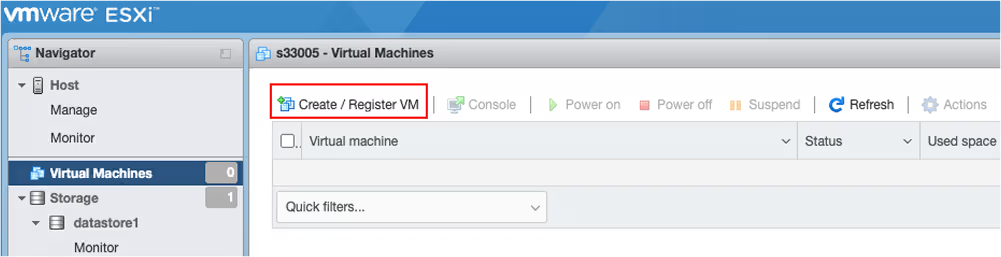
To create a virtual machine, follow these steps:
-
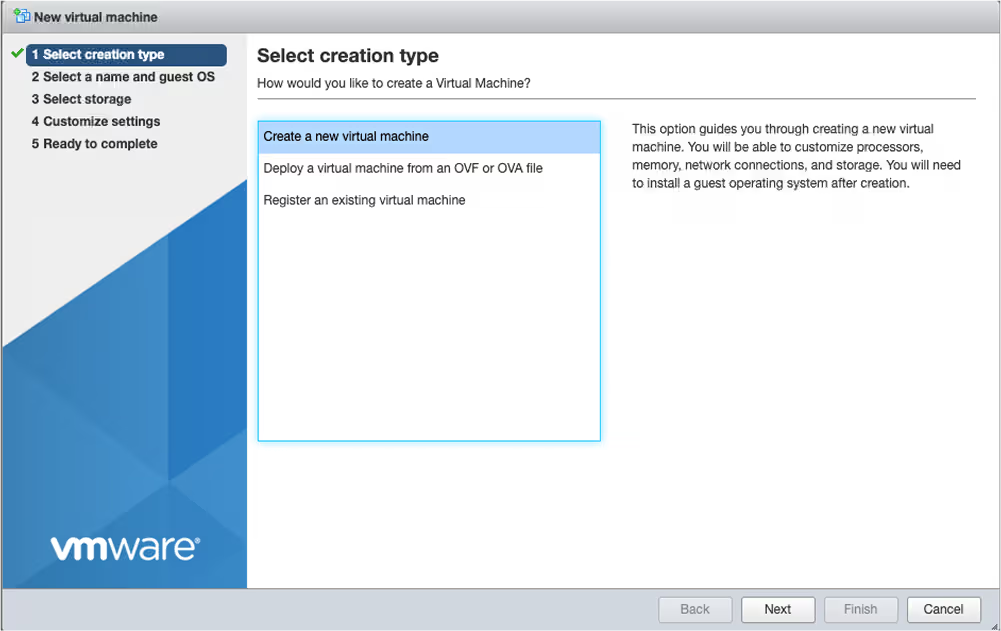
Go to the main Host page or the Virtual Machines page and click Create/Register VM
-
Select Create a new virtual machine and click Next
-
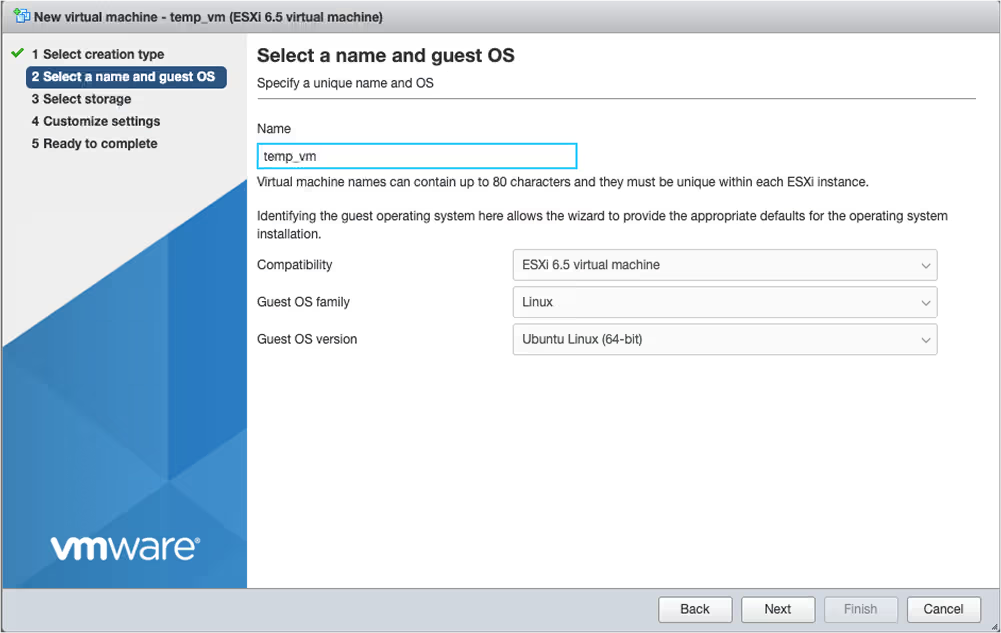
Specify the name of the virtual machine, the Guest OS family, and the Guest OS version
-
Click Next
-
Choose the storage to be used for the installation and click Next

-
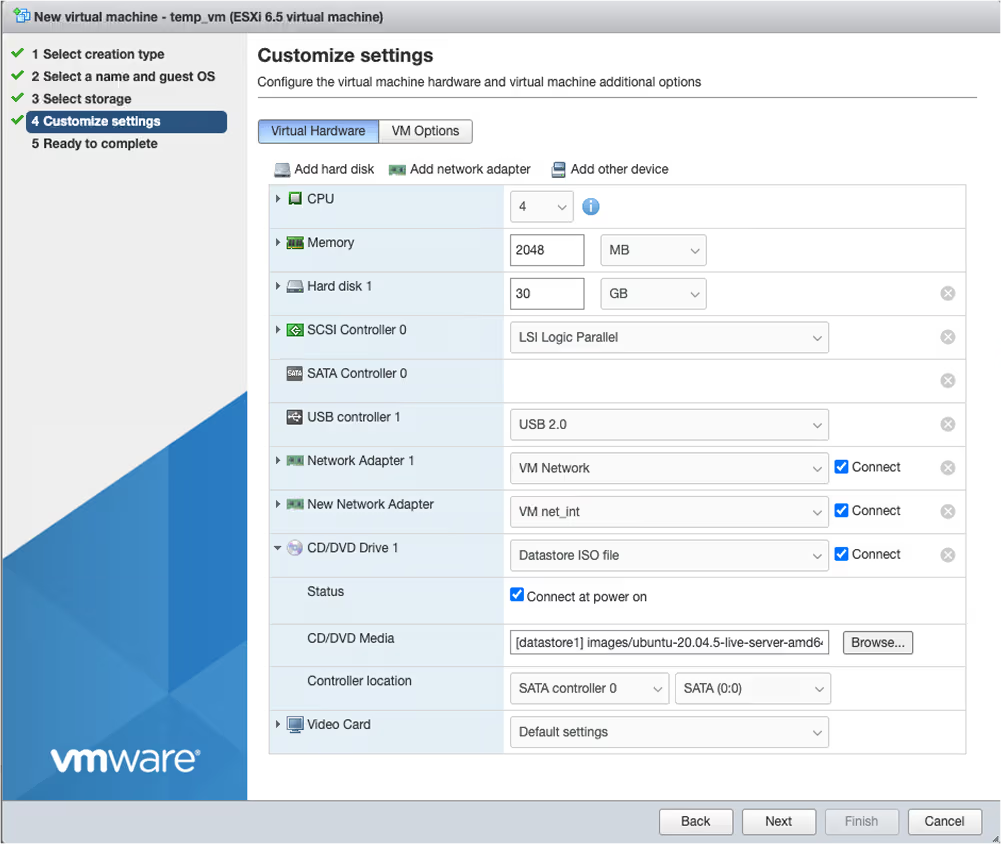
In the next window, select the necessary resources for the virtual machine
-
Configuring public and private networks on the virtual machine (optionally):
-
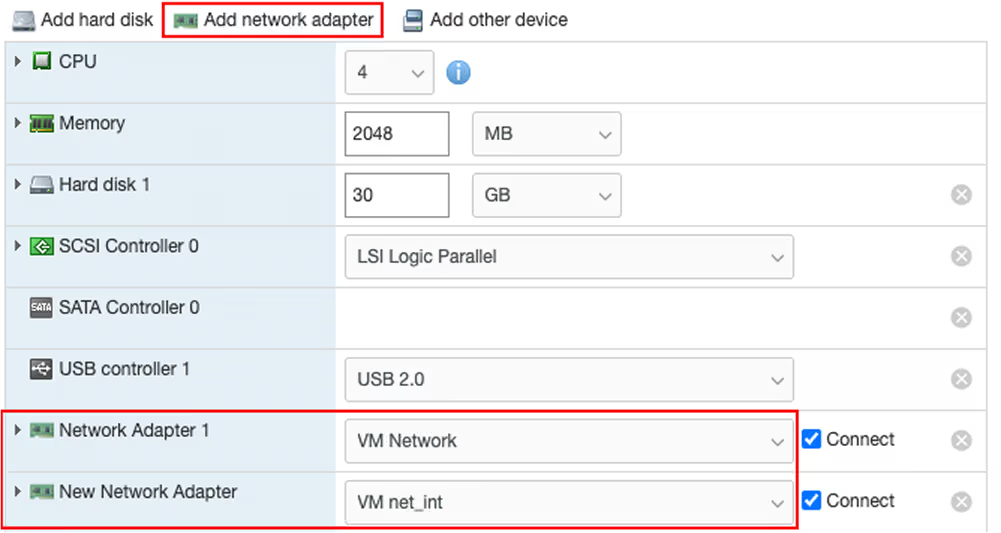
Add another network adapter by clicking Add network adapter if both public and private networks are needed.
For only a private or only a public network, leave one adapter. -
Specify the public (VM Network) and private (VM net_int) port groups for the adapters.
Consider this when configuring the network on the virtual machine.
-
-
Expand the CD/DVD Drive 1 section and choose Datastore ISO file from the drop-down menu
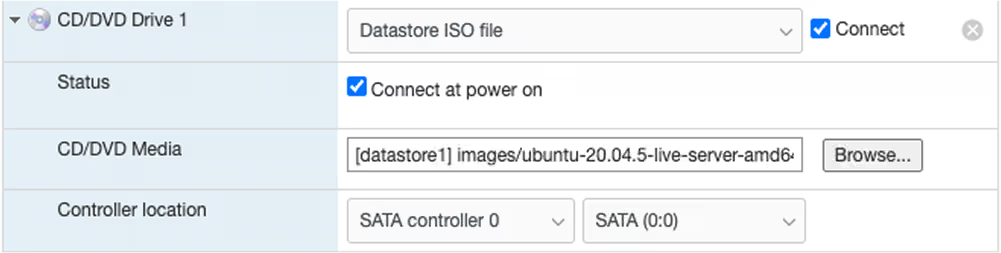
-
Click Browse and specify the path to the previously uploaded image
-
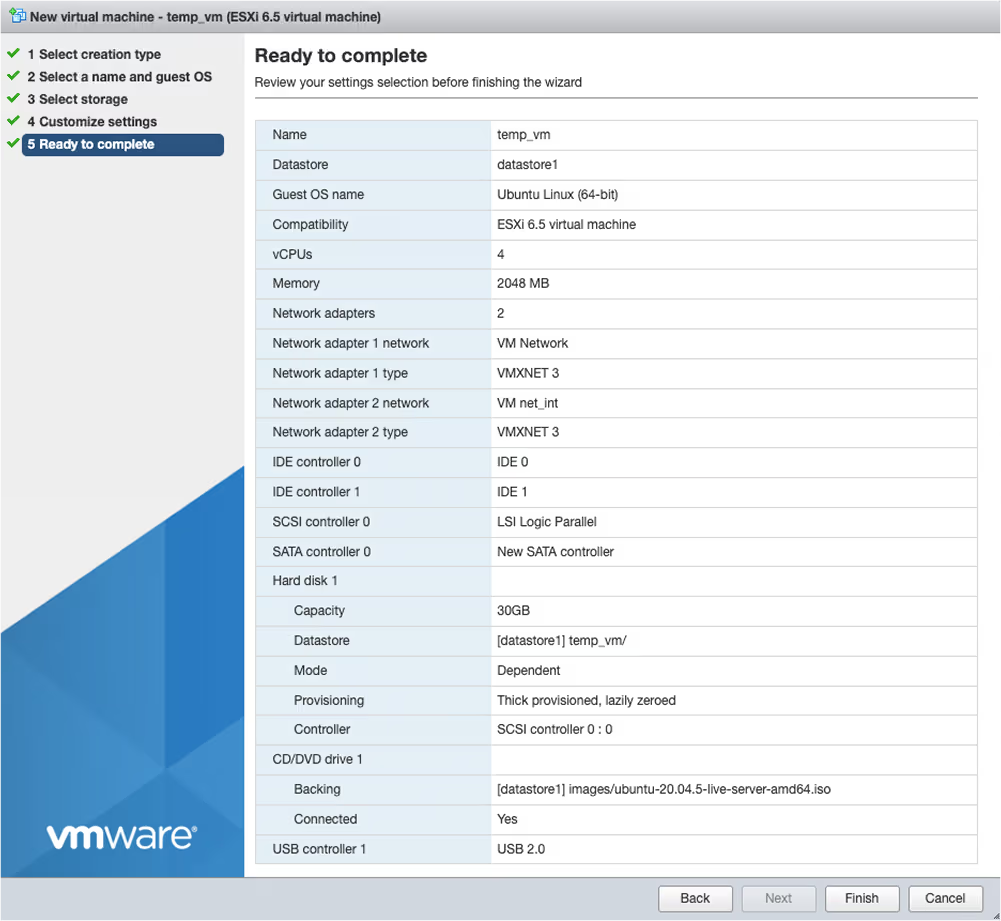
On the last page, review the selected parameters and click Finish
- Go to the virtual machine page, open the console, and complete the OS installation
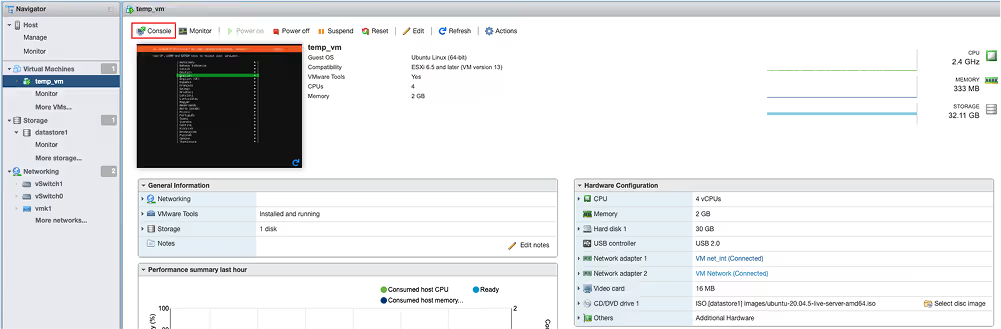
The virtual machine will be created.
Network configuration on the virtual machine
A vSwitch acts as a "bridge" to the physical interfaces. Therefore, to configure the network on the virtual machine, you can use the IP addresses and gateway assigned to the physical server network.
To use an alias IP address, assign it as the primary on the interface included in the public vSwitch port group, and use the main public network's gateway as the gateway. Even though these addresses are in different subnets, this setup will work, including on virtual Windows servers.
Ubuntu
For example, a virtual machine with Ubuntu 20.04 was created. The network settings look as follows:
/etc/netplan/00-installer-config.yaml
# This is the network config written by 'subiquity'
network:
  ethernets:
    ens18:
      dhcp4: false
      addresses:
      - $IP/$NETMASK
      routes:
        - to: 0.0.0.0/0
          via: $PUBLIC_GW
          on-link: true
      nameservers:
        addresses:
        - $DNS_SERVERS
        - $DNS_SERVERS
    ens19:
      dhcp4: false
      addresses:
      - $PRIVATE_IP/$NETMASK
      routes:
        - to: 10.0.0.0/8
          via: $PRIVATE_GW
        - to: 192.168.0.0/16
          via: $PRIVATE_GW
        - to: 188.42.208.0/21
          via: $PRIVATE_GW
      nameservers:
        addresses:
        - $DNS_SERVERS
        - $DNS_SERVERS
  version: 2
Where:
-
$IP– any available IP address in the range assigned to the dedicated server where the virtual machine is created. This can also be an alias IP address. -
$NETMASK– the subnet mask of the IP address range assigned to the dedicated server where the virtual machine is created. It can be /32 (255.255.255.255) if configuring an alias IP address. -
$PRIVATE_IP– the private IP address available to the dedicated server. -
$PUBLIC_GW– the IP address of the gateway in the public network. -
$PRIVATE_GW– the IP address of the gateway in the private network. -
$DNS_SERVERS– private or public DNS servers available to the dedicated server. For example: 192.168.8.8 and 192.168.8.88.
How to configure the network on Hyper-V virtual machine on dedicated servers
Setting up and installation of virtual machines
Setting up
When setting up virtual machines, you need to include the aggi interface in the virtual switch and configure a free IP address on the virtual machine, specifying the main gateway of the physical server's public network.
Installation
Instructions on how to install Hyper-V and create a virtual machine can be found on the official Microsoft website:
Creating vSwitch
In this example, an outdated method of creating NIC teaming, LBFO (Load Balancing/Failover), is used. Starting with Windows server 2016, this teaming method is outdated and not recommended for Hyper-V.
When creating a vSwitch for Hyper-V via the GUI, you might encounter an error:

However, this can be bypassed by creating the vSwitch through PowerShell with the parameter-AllowNetLbfoTeams $true.
Example of creating a vSwitch:
New-VMSwitch -Name "vSwitch" -NetAdapterName "aggi" -AllowNetLbfoTeams $trueBelow are several examples of network configurations for virtual machines running CentOS 7, Ubuntu
CentOS 7
/etc/sysconfig/network-scripts/ifcfg-eth0
TYPE=Ethernet
PROXY_METHOD=none
BROWSER_ONLY=no
BOOTPROTO=none
DEFROUTE=yes
IPV4_FAILURE_FATAL=no
NAME=eth0
DEVICE=eth0
ONBOOT=yes
IPADDR=188.42.29.222
PREFIX=32
GATEWAY=188.42.128.203
DNS1=8.8.8.8
Where:
-
IPADDR=any available IP address in the range assigned to the dedicated server where the virtual machine is created. This can also be an alias IP address. For example 188.42.29.222. -
PREFIX=the subnet mask of the IP address range assigned to the dedicated server where the virtual machine is created. It can be /32 (255.255.255.255) if configuring an alias IP address. -
GATEWAY=the IP address of the gateway in the public network. For example 188.42.128.203.
Ubuntu
/etc/netplan/00-installer-config.yaml
network:
  ethernets:
    eth0:
      addresses:
      – 188.42.29.222/32
      gateway4: 188.42.128.203
      nameservers:
        addresses: [8.8.8.8, 1.1.1.1]
        search: []
  version: 2
/etc/network/interfaces
iface eth0 inet static
address 188.42.29.222
mask 255.255.255.255
gateway 188.42.128.203
Where:
-
IPADDR=any available IP address in the range assigned to the dedicated server where the virtual machine is created. This can also be an alias IP address. For example 188.42.29.222. -
PREFIX=the subnet mask of the IP address range assigned to the dedicated server where the virtual machine is created. It can be /32 (255.255.255.255) if configuring an alias IP address. -
GATEWAY=the IP address of the gateway in the public network. For example 188.42.128.203.
What to do if the operating system on a server won't boot
If the operating system on your server fails to boot, you have several tools at your disposal that can help resolve this issue.
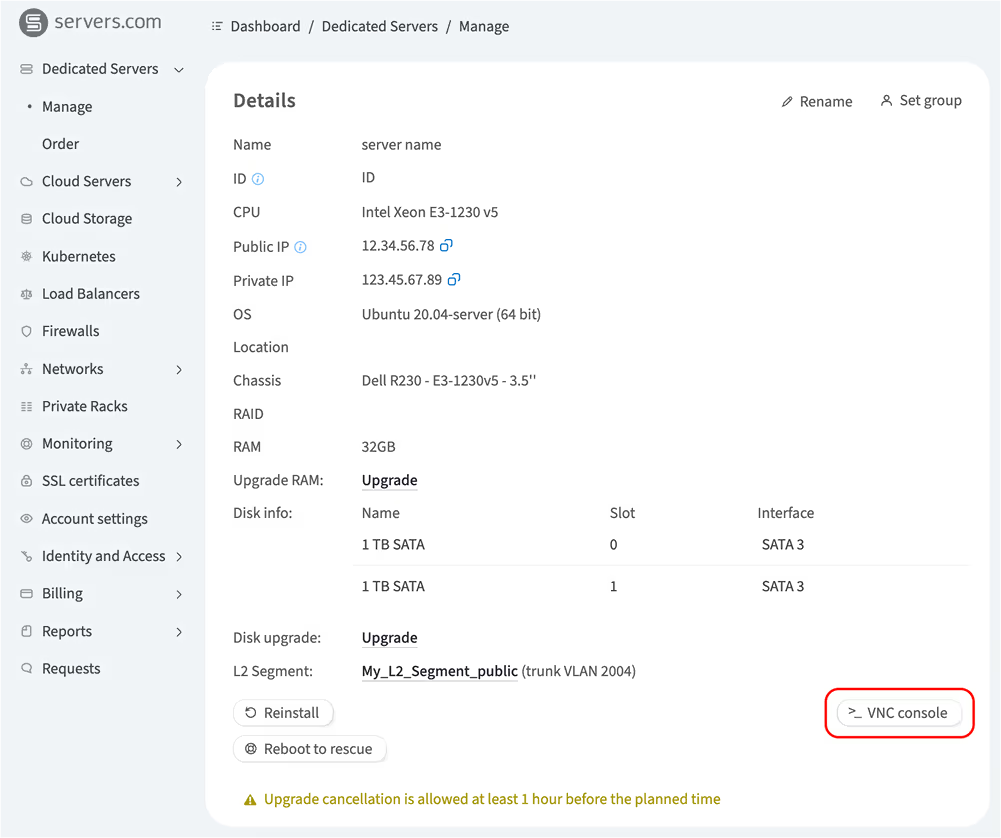
Use the VNC console directly from the customer portal
VNC console allows you to control the keyboard, video, and mouse on your server over the internet. You can launch a VNC session directly from the server’s Details page in the customer portal. VNC console is available even if your server's OS won't boot or is not installed.
Please refer to How to connect to the server via VNC console for detailed instructions.
Boot into the Linux-based rescue image in one click
You can boot your server into the so-called "live" version of a Linux distribution, also known as a recovery image. The Reboot to rescue feature allows you to run the Linux-based rescue image prepared by servers.com without installing it on a server or making any changes to the server's configuration. To boot your server into the rescue image, use the Reboot to rescue button on the server's Details page in the customer portal.
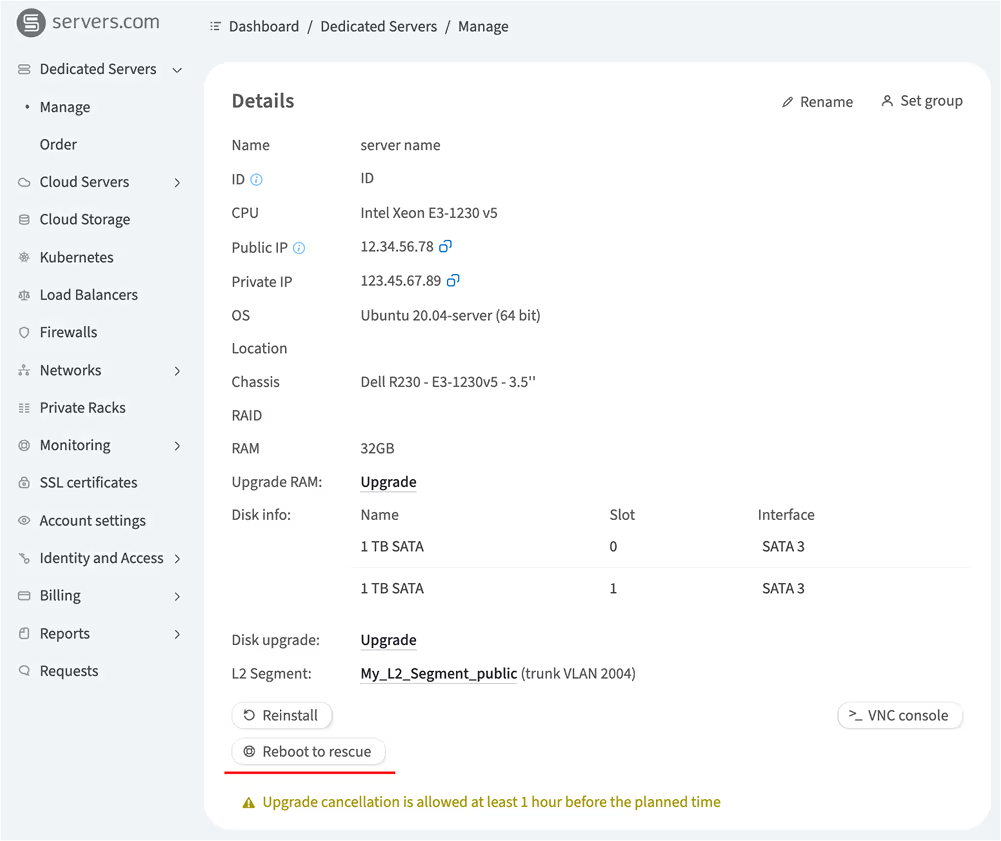
Please refer to How to restore a dedicated server using rescue mode for detailed instructions.
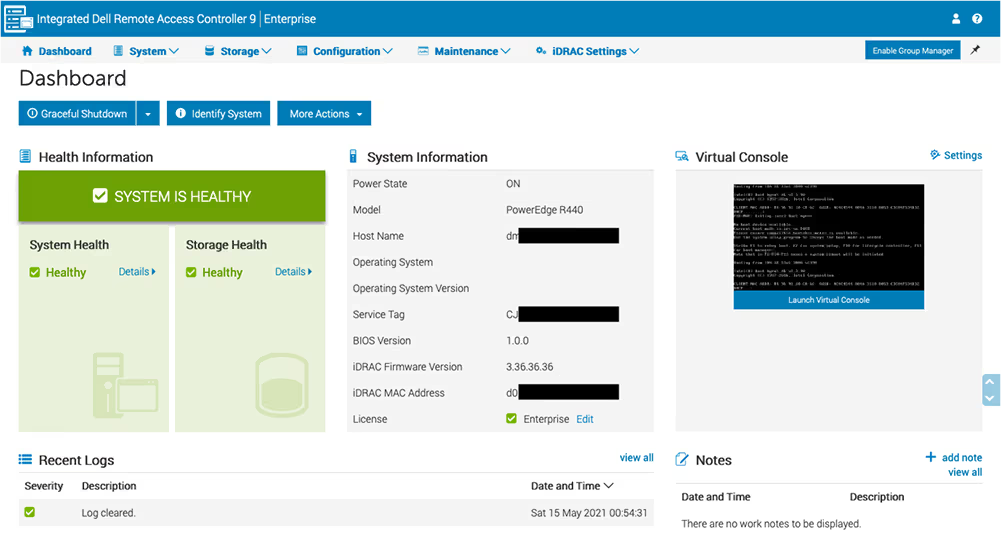
Access virtual console and boot into a custom ISO image using iDRAC
If the recovery image and VNC console features of the customer portal are not sufficient to resolve the issues, use iDRAC.
iDRAC is an out-of-band (OOB) management platform for your Dell server. It is a hardware component located on the server's motherboard that allows system administrators to update and manage their Dell systems even when the server is powered off and the primary network is disconnected. iDRAC provides both a web interface and a command-line interface, enabling administrators to perform remote management tasks. Key features include server power management, hardware sensor monitoring, remote console capabilities, and virtual media access. iDRAC also allows for the remote installation of the operating system.
For detailed instructions for using iDRAC, please refer to the following instructions:
Share
Suggested Articles
- Cloud servers
- Cloud server volumes
- DNS
- Cloud storage
- Customer portal
- Dedicated servers
- Firewall
- Forex VPS
- How it works
- Kubernetes clusters
- L2 segments
- Load balancing
- Scalable bare metal
- VPN to GPN