How to reset an administrator password on Windows on a dedicated server
You can reset a Windows administrator password using two suggested methods:
-
Using a Windows installation image
-
Using rescue mode
Using a Windows installation image
To reset the administrator account password for a 2012-2022 Windows server, complete the following steps:
-
Download a Windows installation image from the official Microsoft website Microsoft Evaluation Center
-
Connect the installation image to iDRAC according to the manual How to Boot from an Image Using iDRAC
-
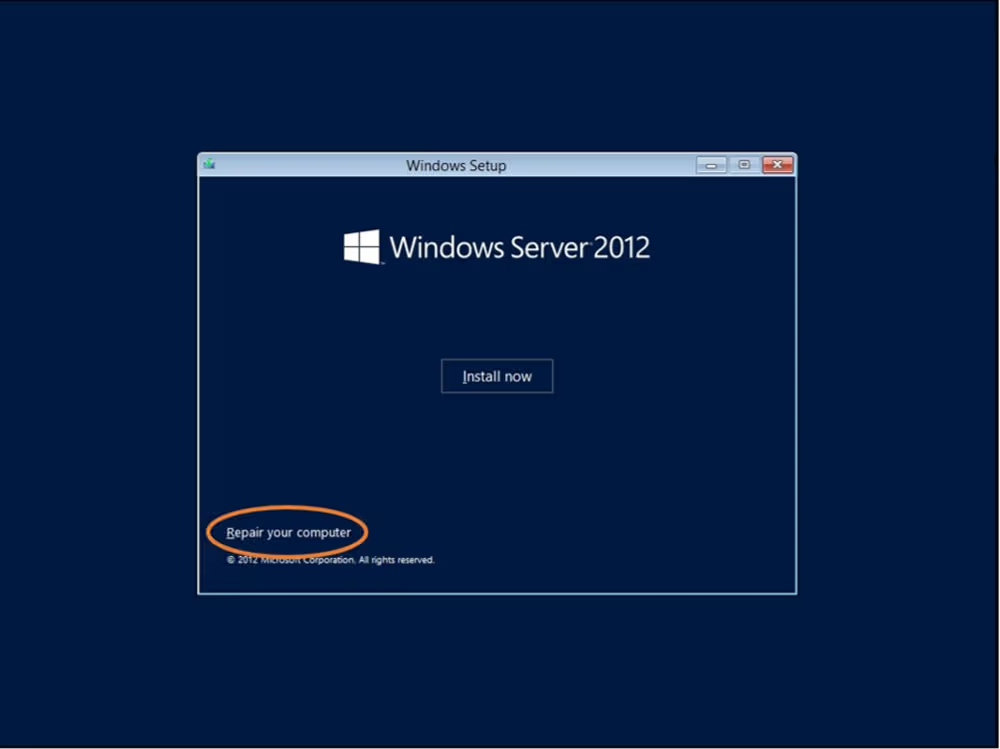
Boot with the installation image and click Next in the Windows Setup window
-
Click Repair your computer
-
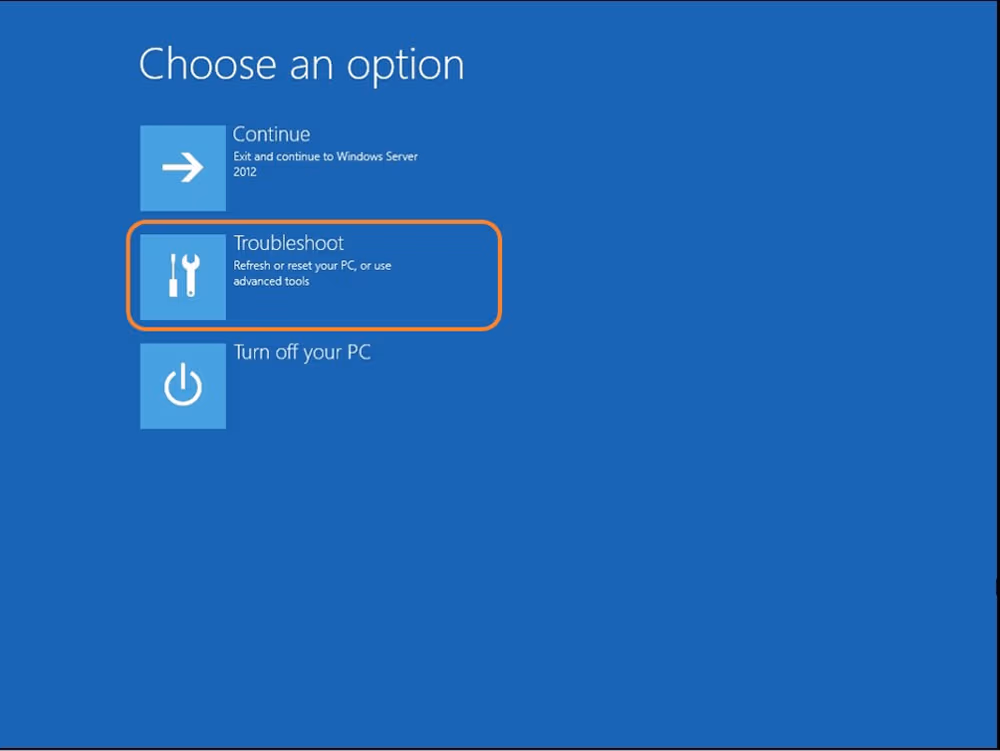
Choose Troubleshoot
-
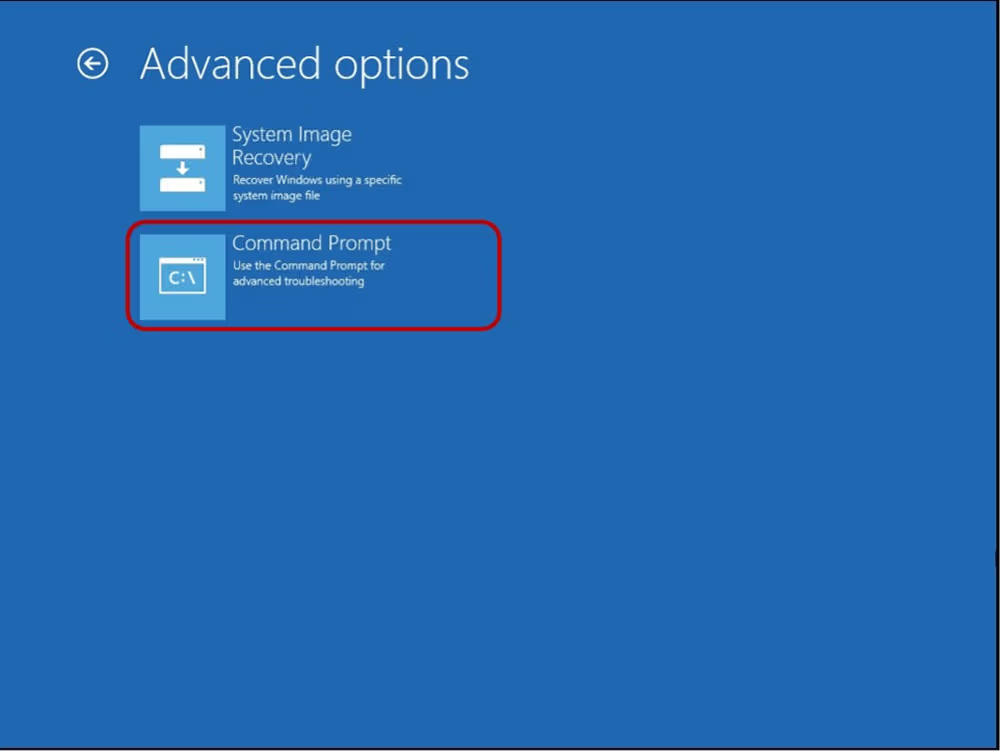
In the Advanced options window, click Command Prompt
-
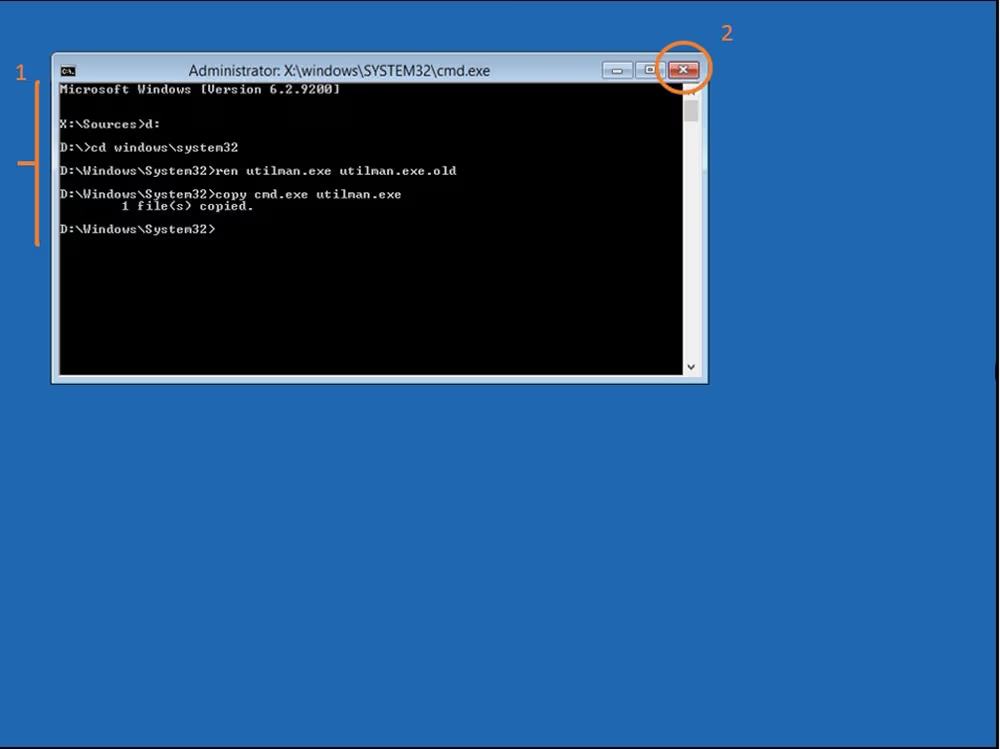
In the opened command line, run the following commands:
X:
cd windows\system32
ren Utilman.exe Utilman.exe.old
copy cmd.exe Utilman.exe
Where X is the letter of the disk on which Windows is installed
-
Close the command line and click Continue
The server will reboot
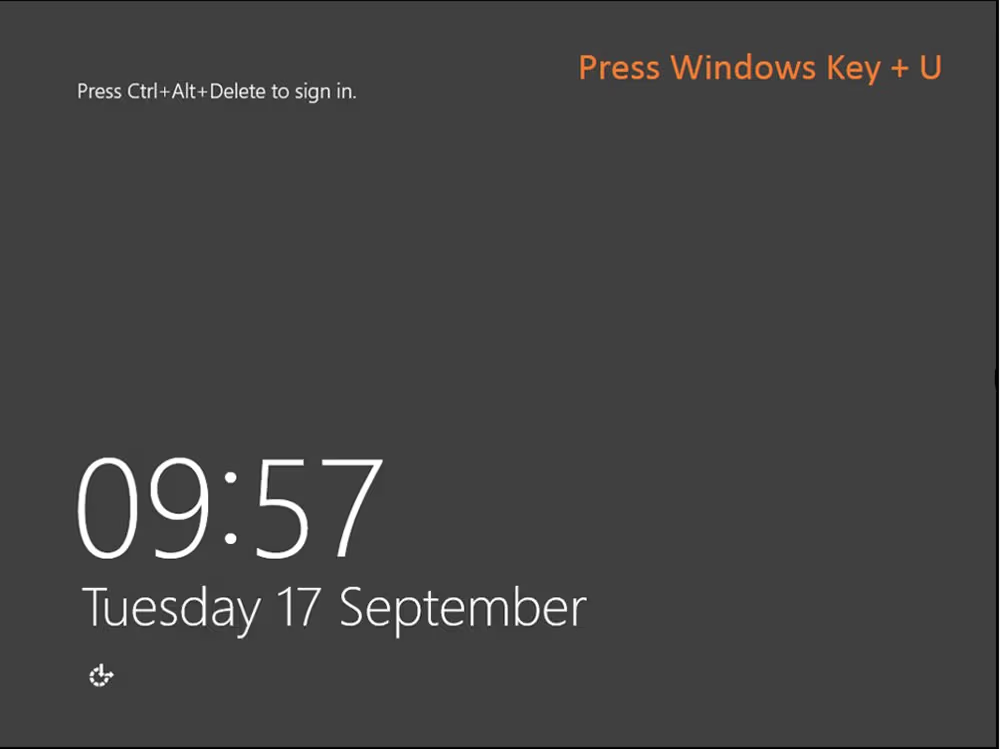
-
Press Windows Key + U on the login screen or click the icon
-
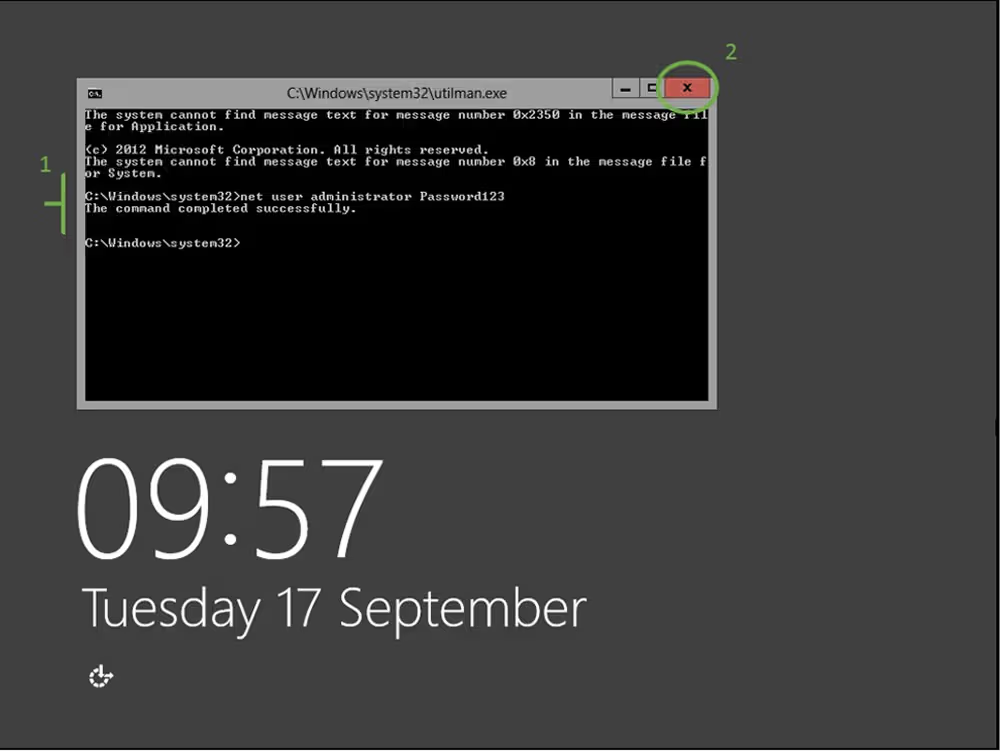
Now, you can change your password for the Administrator. To do this, run the following command in the command prompt, replacing Password123 with your desired password, paying attention to case sensitivity:
net user administrator Password123
The password will be set.
After closing the command prompt, you will be able to access the operating system using the password specified in the previous step.
Using rescue mode
You can also reset the administrator password with rescue mode. To do this, complete the following steps:
-
Open the command prompt using the Win+R combination and shut down Windows correctly by executing the command:
shutdown /s
-
Open the customer portal and navigate to Dedicated Servers → Manage
-
Choose the server and click Details
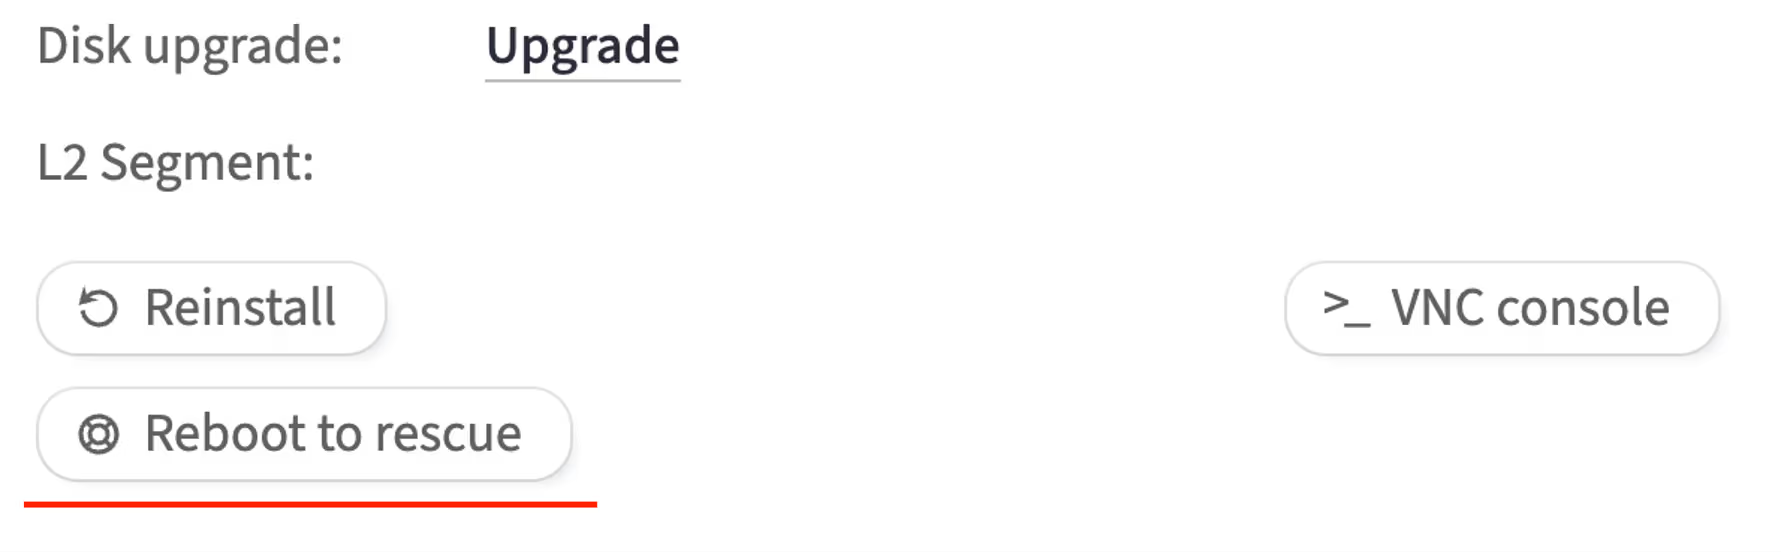
-
In the Details section, click Reboot to rescue
Credentials will be sent to the email addresses of contacts with the primary and technical roles
-
Log in to rescue mode using the credentials you received
-
Find the partition where the operating system was installed. Usually, it is /dev/sda1. To do this, run the following command:
fdisk -l
-
Mount the partition using the following command:
ntfs-3g -o force /dev/sdX /mnt
Where X is the number of partition
If you see the following message when mounting a partition:
Error mounting /dev/sdX
Metadata kept in Windows cache, refused to mount.
Failed to mount '/dev/sdX': Operation not permitted
The NTFS partition is in an unsafe state. Please resume and shutdown
Windows fully (no hibernation or fast restarting), or mount the volume
read-only with the 'ro' mount option.
Then you need to shut down Windows correctly or unmount the partition and execute the following command:
ntfsfix /dev/sdX
Where X is a number of partition
After that, the partition should mount correctly, and you will be able to reset the password
-
Go to the Windows/System32/config/ folder:
cd /mnt/Windows/System32/config/
-
Use the chntpw utility included in the rescue image to reset the password
chntpw -u Administrator SAM
-
Press 1 and confirm overwriting of SAM file, by pressing Y key
Remove your server from the rescue mode and run the operating system. You will not need to enter an administrator password when logging in. You can set a new password by pressing Ctrl+Alt+Del and click Change password.
How to reset the root password on Ubuntu 16.04 / Debian 7-8 / Proxmox on a dedicated server
If you have lost the root password for the server and cannot log in with superuser privileges, this article will help you resolve the issue without requiring the old password.
Reboot the server using the VNC console
-
Open the customer portal and navigate to Dedicated Servers → Manage
-
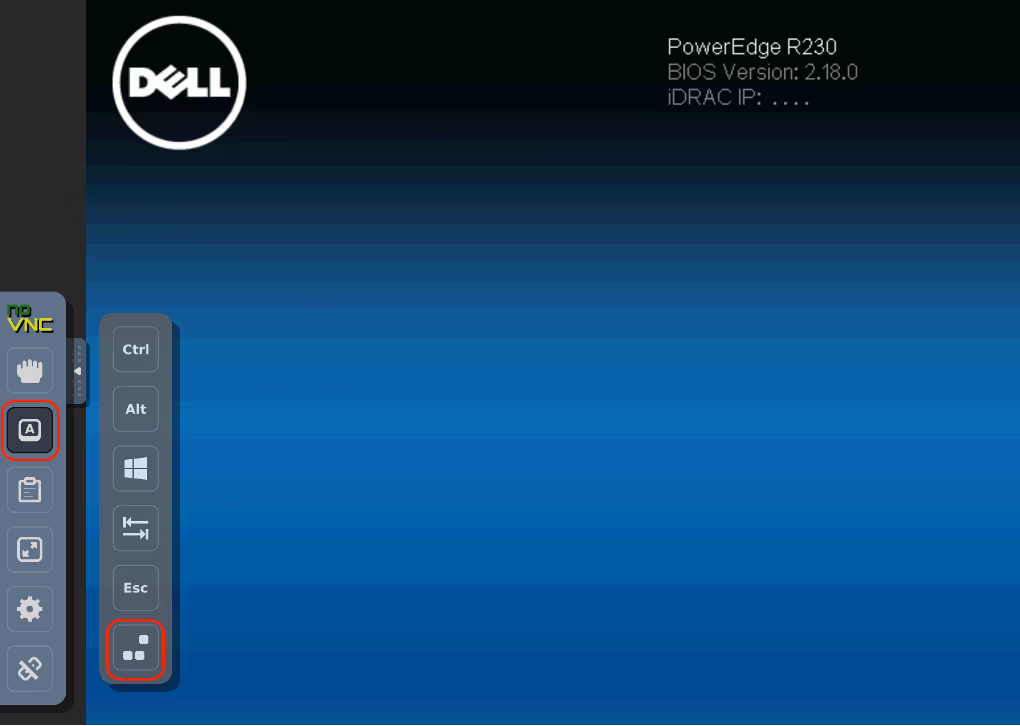
Select the server and click VNC console in the Details section
-
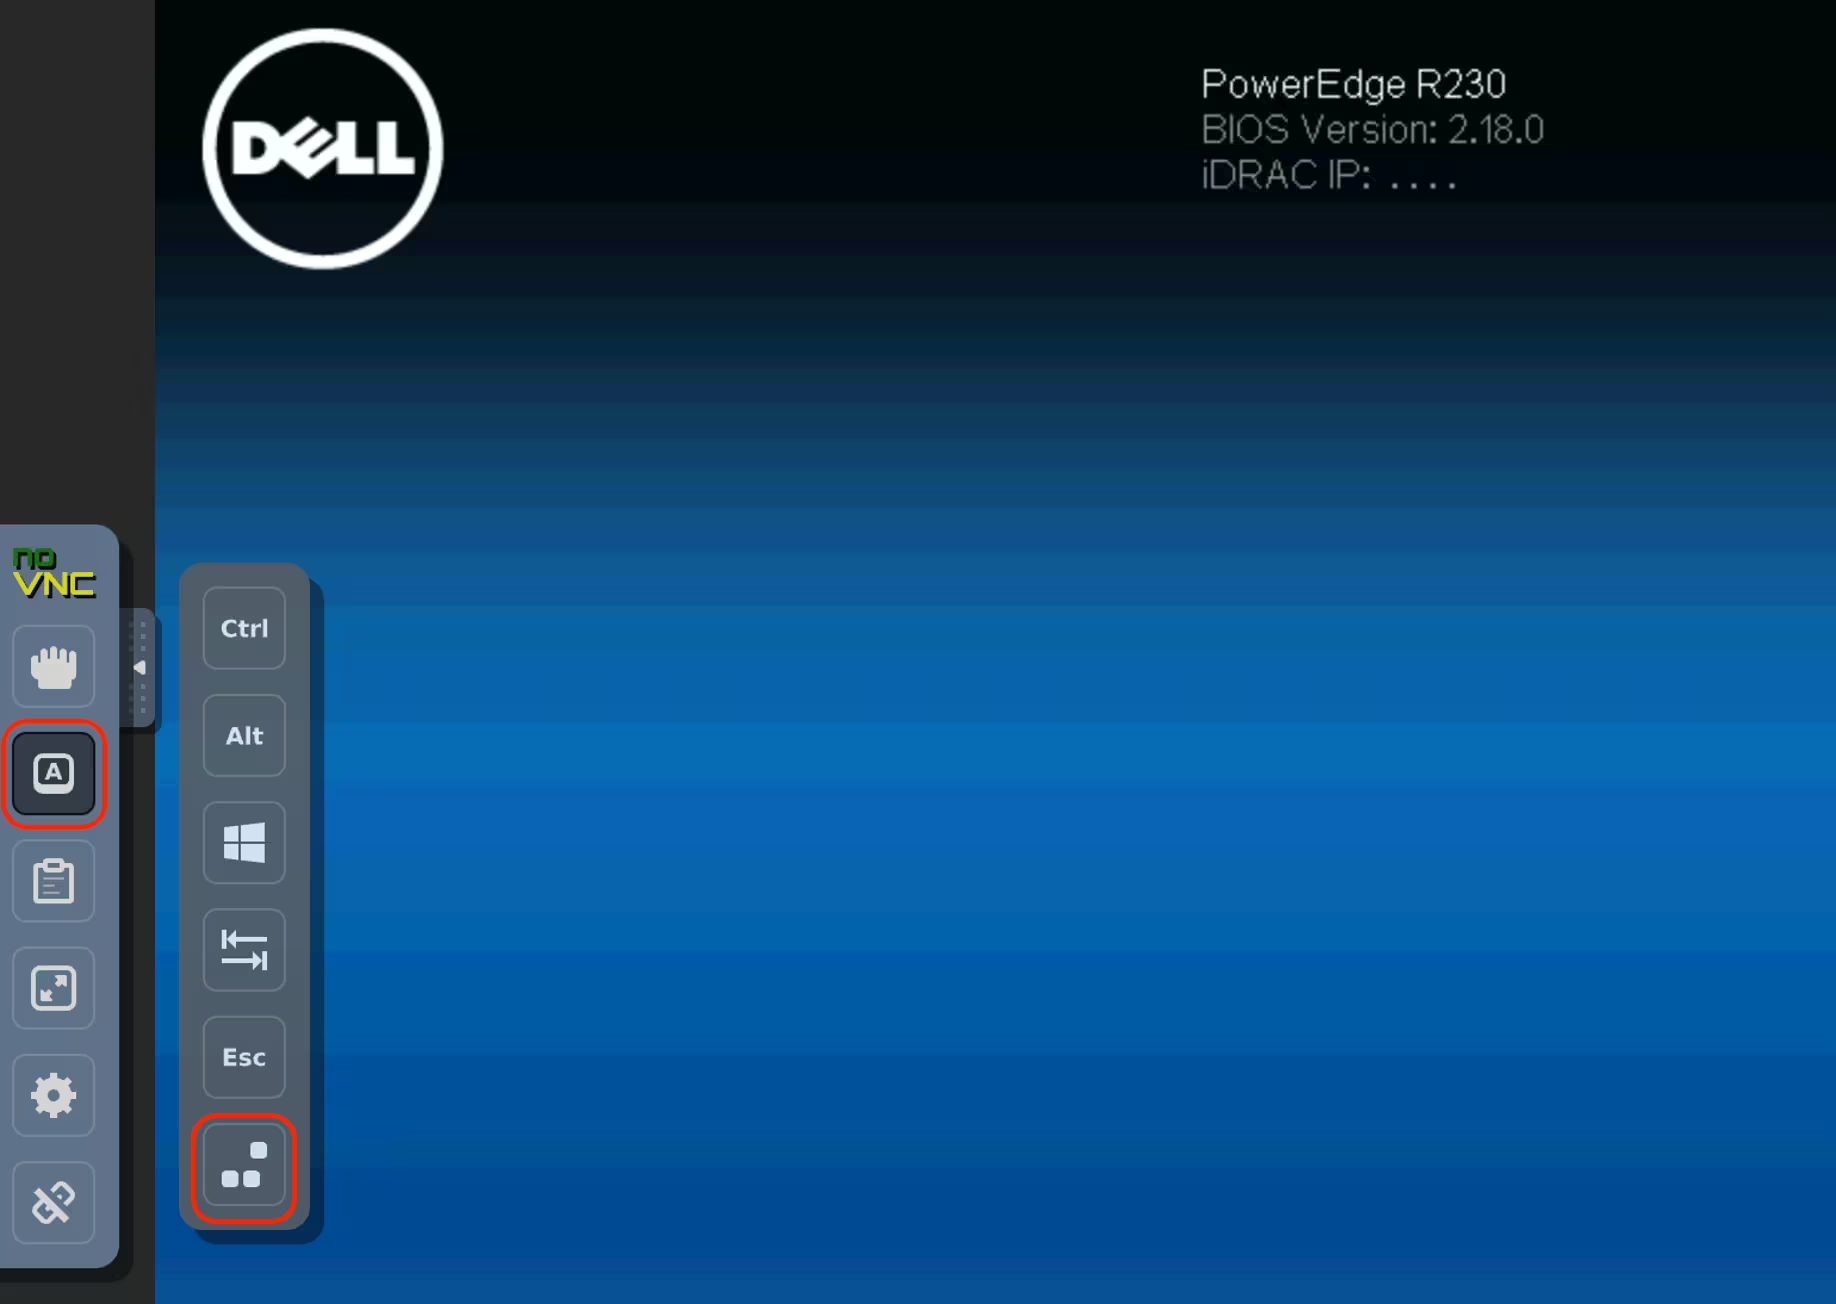
In the VNC console window, click the Send CtrlAltDel button
Before the OS starts and after the BIOS menu, a boot menu and timer will appear. To stop the timer, press any key, such as any arrow key or Ctrl
Boot the OS in single-user mode
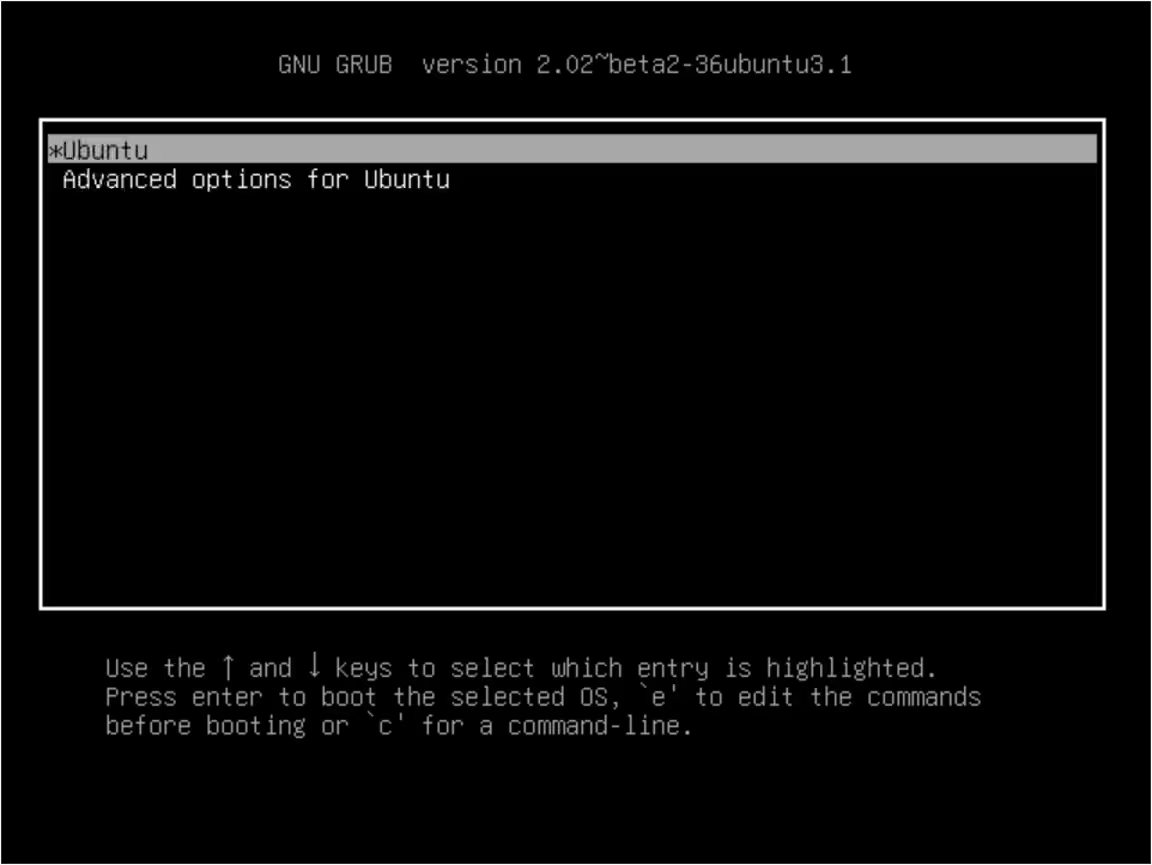
To boot the OS in single-user mode, you need to change the kernel boot parameters in the GRUB bootloader menu. To do this:
-
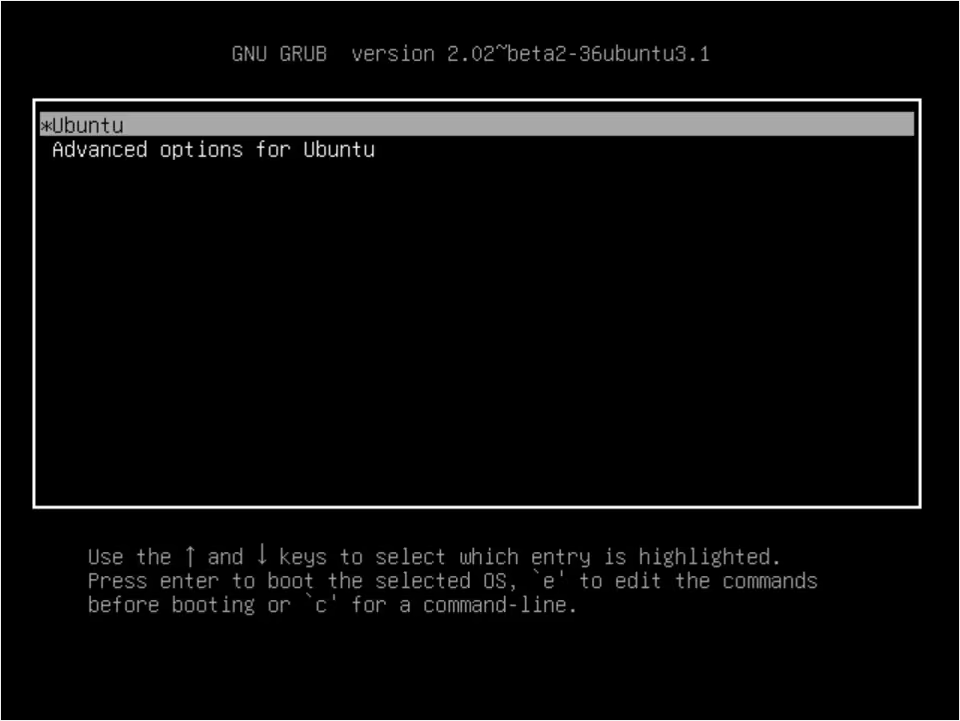
Use the ↓ and ↑ keys to navigate the menu and select the boot line (usually named "Ubuntu" or "Debian")
-
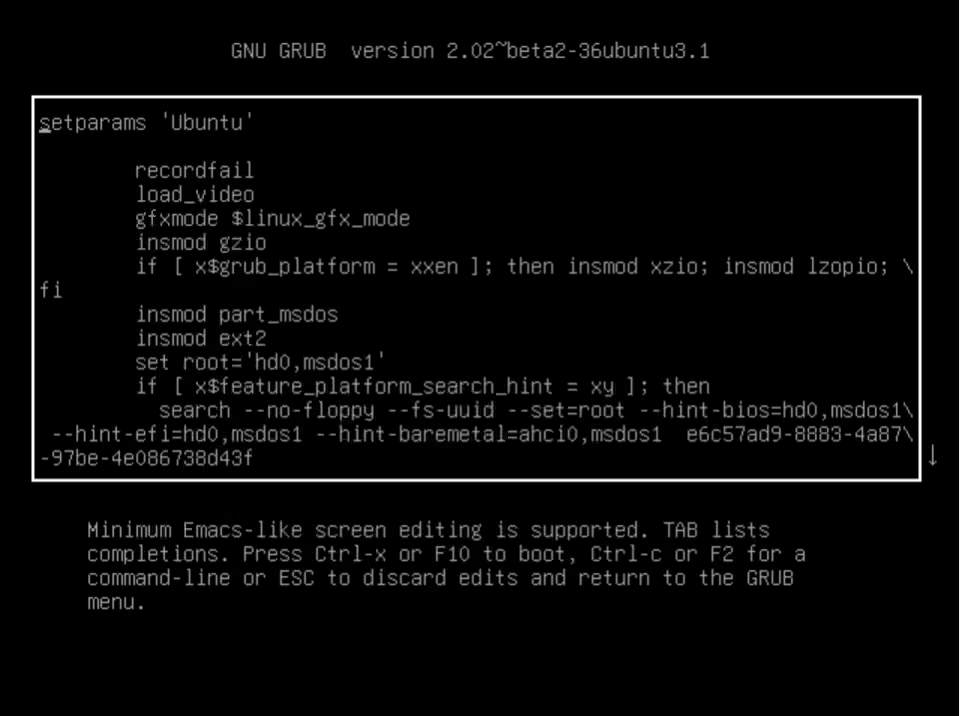
Press the E key to access the boot mode editing options
-
Find the line that starts with linux /boot
-
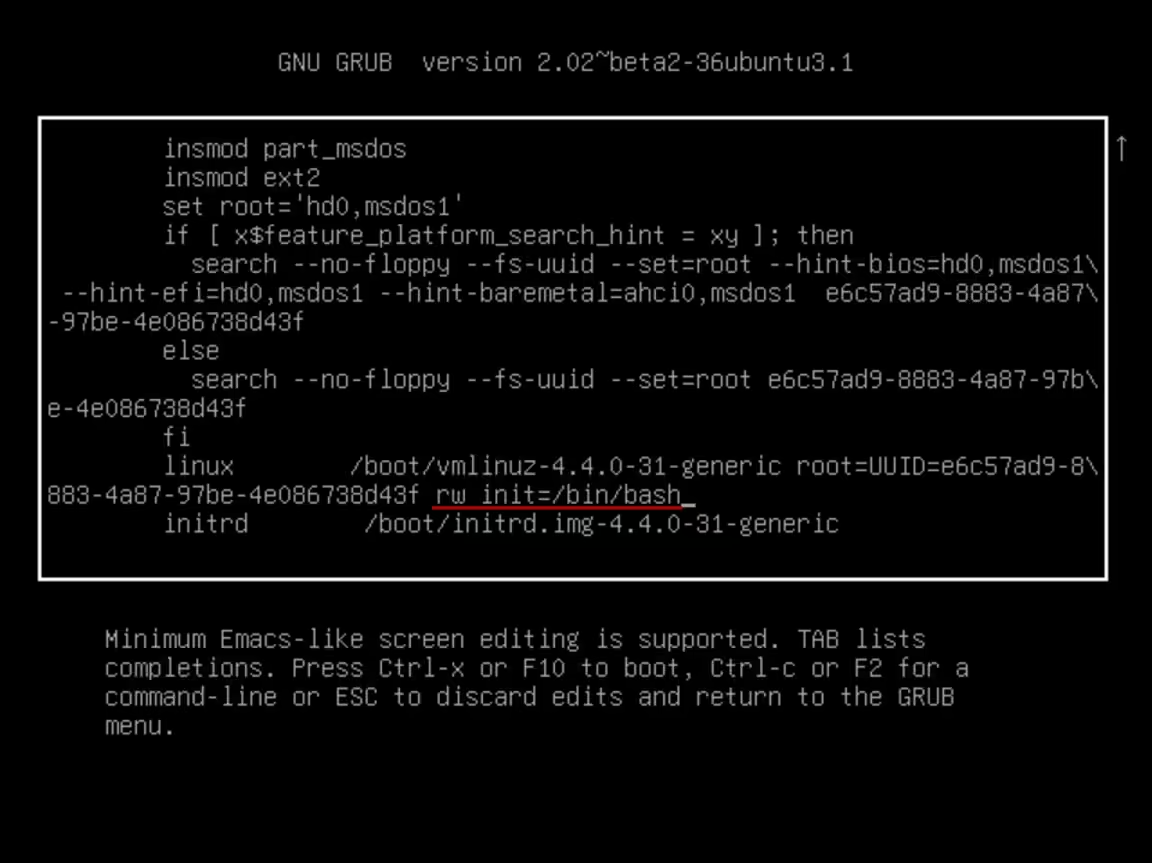
Change the parameter ro to rw and add the parameter init=/bin/bash at the end of the line
- Boot the system in single-user mode by pressing CTRL+X or F10
The server will reboot and the console will open.
Set a new root password
-
In the console, execute the command:
passwd root
-
Enter the new root user password twice
The root user password is changed
-
Save the changes to disk and reboot the server using the following commands:
sync reboot -f
The new root user password will be set.
How to reset the root password on Ubuntu 18.04+ / Debian 9+ / Proxmox on a dedicated server
If you have lost the root password for the server and cannot log in with superuser privileges, this article will help you resolve the issue without requiring the old password.
Reboot the server using the VNC console
-
Open the customer portal and navigate to Dedicated Servers → Manage
-
Select the server and click VNC console in the Details section
-
In the VNC console window, click the Send CtrlAltDel button
Before the OS starts and after the BIOS menu, a boot menu and timer will appear. To stop the timer, press any key, such as any arrow key or Ctrl
Boot the OS in single-user mode
To boot the OS in single-user mode, you need to change the kernel boot parameters in the GRUB bootloader menu. To do this:
-
Use the ↓ and ↑ keys to navigate the menu, and select the boot line (usually named "Ubuntu" or "Debian")
-
Press the E key to access the boot mode editing options
-
Find the line that starts with linux /vmlinuz
-
Change the parameter ro to rw and add the parameter init=/bin/bash at the end of the line
-
Boot the system in single-user mode by pressing CTRL+X or F10
The server will reboot and the console will open.
Set a new root password
-
In the console, execute the command:
passwd root
-
Enter the new root user password twice. The root user password is changed
-
Save the changes to disk and reboot the server using the following commands:
sync reboot -f
The new root user password will be set.
How to restore the configuration of network interfaces on a dedicated server
Restoring the configuration of network interfaces on a dedicated server is a critical task that ensures the server's connectivity and functionality. Whether due to accidental changes, system upgrades, or hardware replacements, network settings might need to be restored to a known, working state. Below is a step-by-step guide on how to effectively restore network interface configurations, ensuring minimal downtime and maintaining network integrity.
This guide is not suitable for Windows based systems.
Downloading the default network configuration image of a server
-
In the left-hand menu, navigate to Dedicated Servers → Manage
-
Choose the server and click Details
-
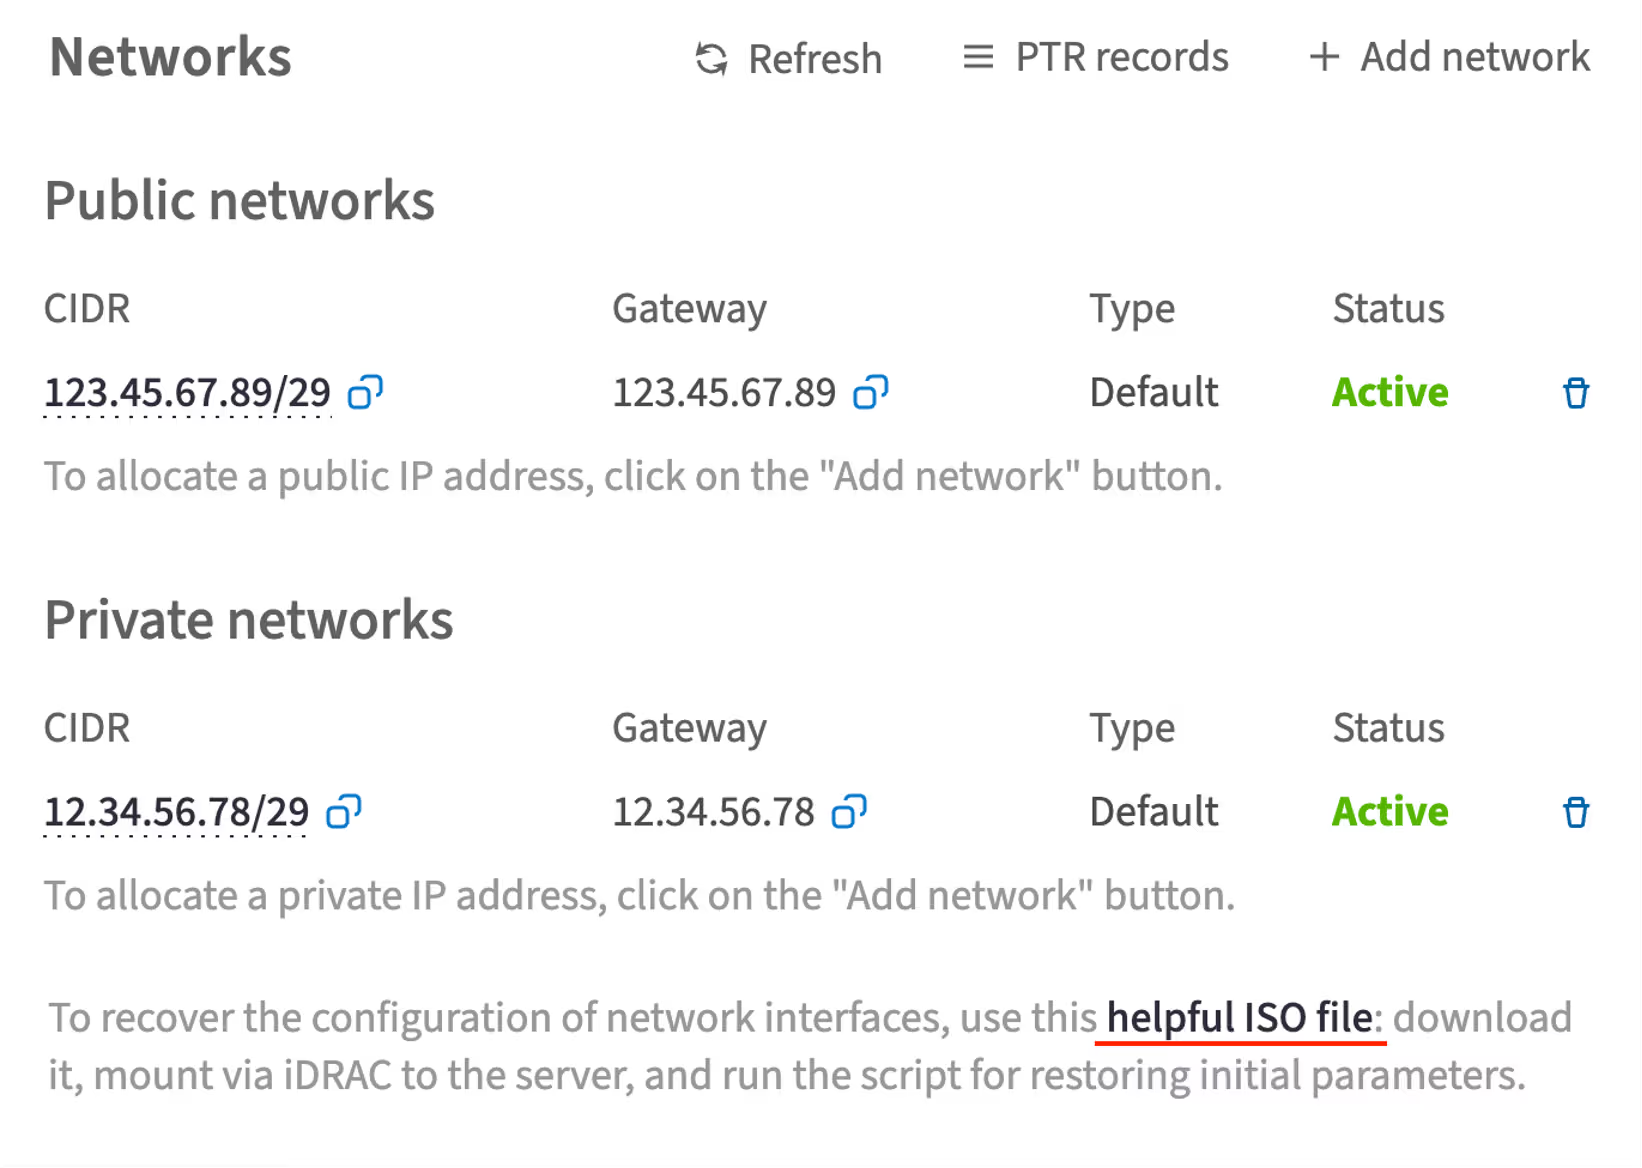
Scroll down to the Networks section and download the configuration image by clicking the helpful ISO file
Mounting the image
-
Use the instructions How to boot a bare-metal server into a custom ISO image remotely using iDRAC to complete tasks such as Enabling virtual media feature in iDRAC and Using a local ISO image as virtual media
-
Mount the downloaded configuration image to the iDRAC
Restoring network settings
Linux
-
Mount the image to the file system in the /mnt directory:
mount /dev/cdrom /mnt
-
Navigate to the /mnt directory
cd /mnt
-
Network configuration scripts for all Linux-based operating systems that we provide are available inside the image:
-
Run the script for the required OS. In this example, it is a script for CentOS 7:
bash linux.sh
-
After running the script, restart the network service:
systemctl restart network
The network configuration of the server will be restored to its initial settings.
VMware ESXi
-
Load a kernel module:
vmkload_mod iso9660
-
Define the name of the virtual CD-ROM:
esxcfg-mpath -l | grep CD-ROM
-
Mount the virtual CD-ROM (in this example, we use the name vmhba32:C0:T0:L0):
vsish -e set /vmkModules/iso9660/mount mpx.vmhba32:C0:T0:L0
-
Run a script:
sh /vmfs/volumes/CDROM/vmware.sh
The network configuration of the server will be restored to its initial settings.
SMART for disks
SMART (Self-Monitoring, Analysis, and Reporting Technology) is a technology that provides users with various data about the current state of a hard disk drive or solid-state drive (SSD). Analyzing SMART data helps assess the health of server drives and determines whether they need replacing or can continue operating reliably.
To work with SMART, you need the smartmontools package installed, and the drive must support this technology.
How to get SMART for disks in a dedicated server without a RAID controller
Step 1: Install smartmontools
The installation command may vary depending on your Linux distribution.
-
Debian/Ubuntu:
sudo apt-get update
sudo apt-get install smartmontools
-
Red Hat/CentOS:
sudo yum install smartmontools
-
Fedora:
sudo dnf install smartmontools
Step 2: Identify the disk
To identify the disk you want to check, you can use the lsblk or fdisk -l command to list all available disks and their device names.
Step 3: Check SMART Status
Now you can use the smartctl command to check the SMART status of the disk. Replace /dev/sdX with the appropriate device name.
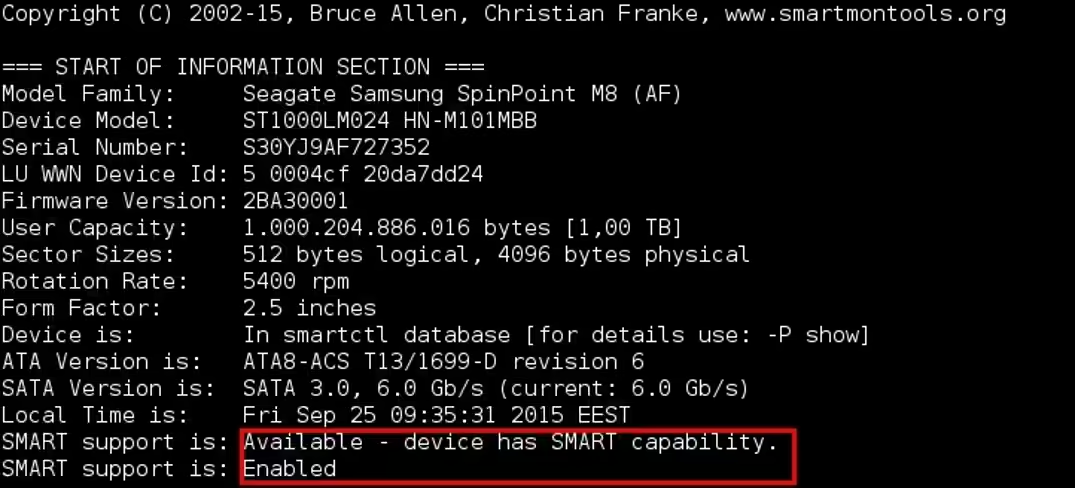
sudo smartctl -i /dev/sdX
This command will display a comprehensive SMART report for the disk.
The last two lines of the output indicate that SMART is supported and enabled.
If SMART is disabled on your disk, you can enable it using the following command:
sudo smartctl -s on /dev/sdX
To check the overall status of the drive, run the command with the -H key.
sudo smartctl -H /dev/sdX
If the output shows anything other than PASSED, it indicates that the drive either has already failed or is expected to fail within the next 24 hours.
To get comprehensive SMART information about the drive, run the command with the -A key.
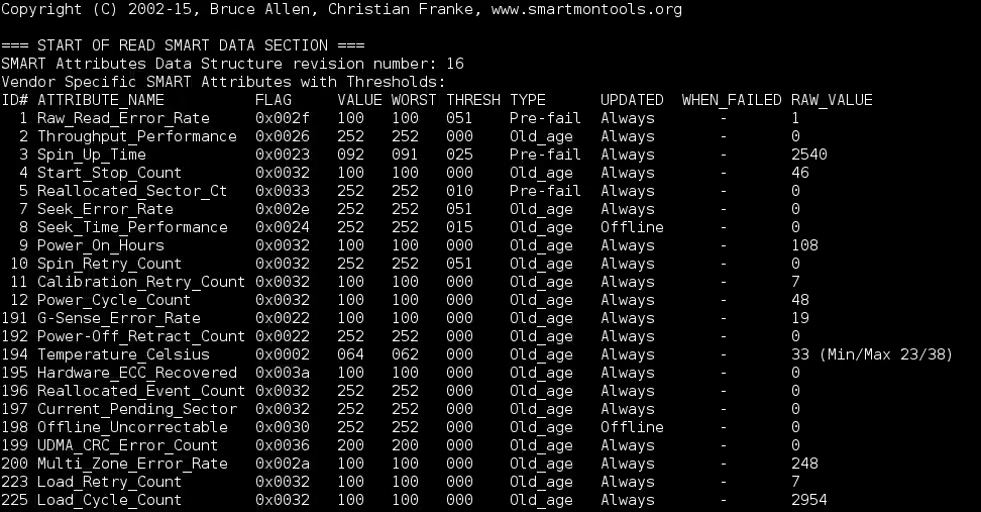
sudo smartctl -A /dev/sdX
The output will look like this:
For evaluating the drive's condition, it's sufficient to understand the following:
-
ATTRIBUTE_NAME – the name of the attribute being assessed (e.g., disk temperature).
-
VALUE – the value of the attribute. A low value indicates rapid disk degradation or potential imminent failure. Compare this value to THRESH. A higher Value attribute indicates better health. If the attribute is critical (see Type) and its value is below THRESH, it's a concerning sign.
-
THRESH (threshold) – the threshold value set by the disk's manufacturer. This value remains constant throughout the disk's lifecycle. If the Value of an attribute reaches or falls below this threshold, a notification will appear in the WHEN_FAILED column.
-
TYPE – attributes can be critical (Pre-fail) or non-critical (Old_age). Exceeding the threshold of a critical attribute essentially means the drive is failing. Exceeding permissible values of a non-critical attribute indicates there's a problem, but the drive may still be operational.
Important parameters for analyzing SMART data of HDDs
These parameters provide essential insights into the health and reliability of a hard disk drive.
-
Reallocated_Sector_Ct
-
Reallocated_Event_Count
-
Current_Pending_Sector
-
Offline_Uncorrectable
-
Power_On_Hours
-
Hardware_ECC_Recovered
-
UDMA_CRC_Error_Count
Reallocated Sectors Count: this indicates the number of reallocated sectors. It's a critical parameter for assessing disk health. A high RAW_VALUE indicates potential issues. If the value exceeds 30 and is increasing, consider replacing the disk.
Reallocated Event Count: this refers to the total number of successful and unsuccessful attempts to reallocate faulty sectors to the disk's spare area.
Current Pending Sector: this indicates the number of sectors that the drive has currently flagged for potential reallocation to the reserve area. If any of these sectors are successfully read in the future, they are removed from this list.
Offline Uncorrectable: this indicates the total count of errors that occurred during reading or writing sectors that couldn't be corrected. An increasing RAW_VALUE suggests surface defects or mechanical issues.
Power On Hours: the total hours the disk has been powered on.
Hardware ECC Recovered: this attribute indicates the number of hardware errors that have been corrected by the drive's own software. The RAW_VALUE can vary significantly by manufacturer; focus on the VALUE and THRESH indicators. Consider replacing the disk if VALUE approaches THRESH.
UDMA CRC Error Count: this attribute indicates the number of errors occurred during data transmission via the cable and physical interface of the disk. A low RAW_VALUE is ideal. If the count increases, check the disk.
Important parameters for analyzing SMART data of SDDs
SSD manufacturers have not yet established a unified standard for SMART attributes for SSDs. Therefore, each SSD model from different manufacturers provides information on different SMART attributes. Alternatively, the same attribute may have different indicators for models from different manufacturers.
Often, when checking the SMART data of an SSD, the output contains many Unknown_Attribute entries, which do not provide any useful information. This happens because the smartmontools database is outdated and lacks the necessary records to interpret these attributes. To fix this, you need to update the smartmontools database:
-
Check the version of the smartmontools database using the following command:
smartctl -V
-
Download the database from the SMARTmontools website that matches your version of smartmontools. Place the downloaded drivedb.h database file into the /var/lib/smartmontools/drivedb/ directory
If your SSD model has been added to the database, the Unknown_Attribute entries will turn into specific SMART attributes during the next check. You can verify if your disk model has been added to the database by checking the drivedb.h file itself.
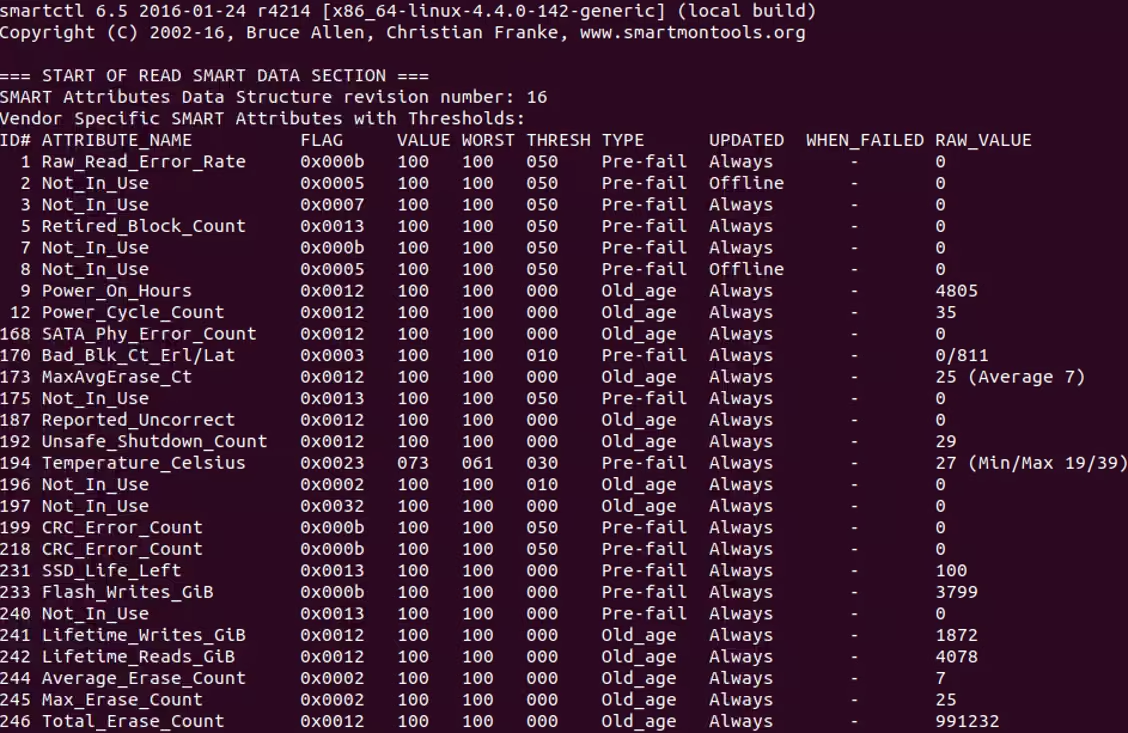
Example of SMART output for an SSD:
The following attributes are important when evaluating the SMART output for SSDs:
-
Raw Read Error Rate: the frequency of errors when reading data from the drive. A high value in the RAW_VALUE column may indicate problems with the drive. Also, pay attention to the VALUE column; if it decreases to THRESH, the drive needs to be replaced.
-
Retired Block Count: the number of blocks that are no longer used for writing data to the drive. High values of RAW_VALUE and VALUE figures close to THRESH indicate that the drive will need to be replaced soon.
-
Power On Hours: the number of hours the drive has been operating for
-
Temperature Celsius: the drive temperature in Celsius. VALUE and WORST values are calculated using the formula:
100 – RAW_VALUE Min = VALUE, 100 – RAW_VALUE Max = WORST
If VALUE or WORST values approach THRESH, you should prepare to replace the drive.
-
SSD_Life_Left: one of the most important attributes indicating the condition of the SSD. RAW_VALUE indicates the percentage of remaining life. A new drive has a value of 100%, which decreases over time. If the value is low and approaches zero, it's time to replace the drive.
-
Lifetime_Writes_GiB: the amount of data written in gibibytes over the drive's lifetime. Each manufacturer guarantees a certain amount of data that can be written to the drive without worrying about data integrity. This information can be found on the official websites of the manufacturers.
Additionally, other SSD models may provide these important parameters:
-
Wear Leveling Count: similar to SSD_Life_Left. Indicates the remaining drive life as a percentage. A new drive has a value of 100%, which decreases over time. The values of the VALUE and THRESH pair for this attribute are important. The RAW_VALUE is not as crucial.
-
Percent_Life_Remaining: similar to SSD_Life_Left and Wear Leveling Count. VALUE indicates the percentage of remaining drive life. A new drive has a value of 100%, which decreases over time. If the value approaches zero, it's time to replace the drive. RAW_VALUE indicates the reverse - the percentage of used drive life.
-
Used Reserved Block Count: indicates the condition of the reserved blocks of the SSD. Like HDDs, SSDs also have reserved blocks used when primary blocks fail and become unsuitable for writing data. The attribute indicates the percentage of the reserved block pool for data writing. For some SSD models, RAW_VALUE may show the number of used reserved blocks, but it is better to focus on the values of the VALUE and THRESH pair. If the drive starts using reserved blocks, it is likely beginning to fail, and it is advisable to replace it, especially if performance or stability issues have been observed.
-
Total LBAs Written / Total Host Sector Writes: indicates the number of written blocks/sectors. This helps to determine the amount of data written to the drive. Manufacturers generally consider 1 block = 512B, but this should be clarified in the specific disk model's specifications. Many disks have TBW (Total Bytes Written) or DWPD (Disk Write per Day) values provided by the manufacturers, which can help estimate the drive's resource usage.
Important parameters in the analysis of SMART for NVMe drives
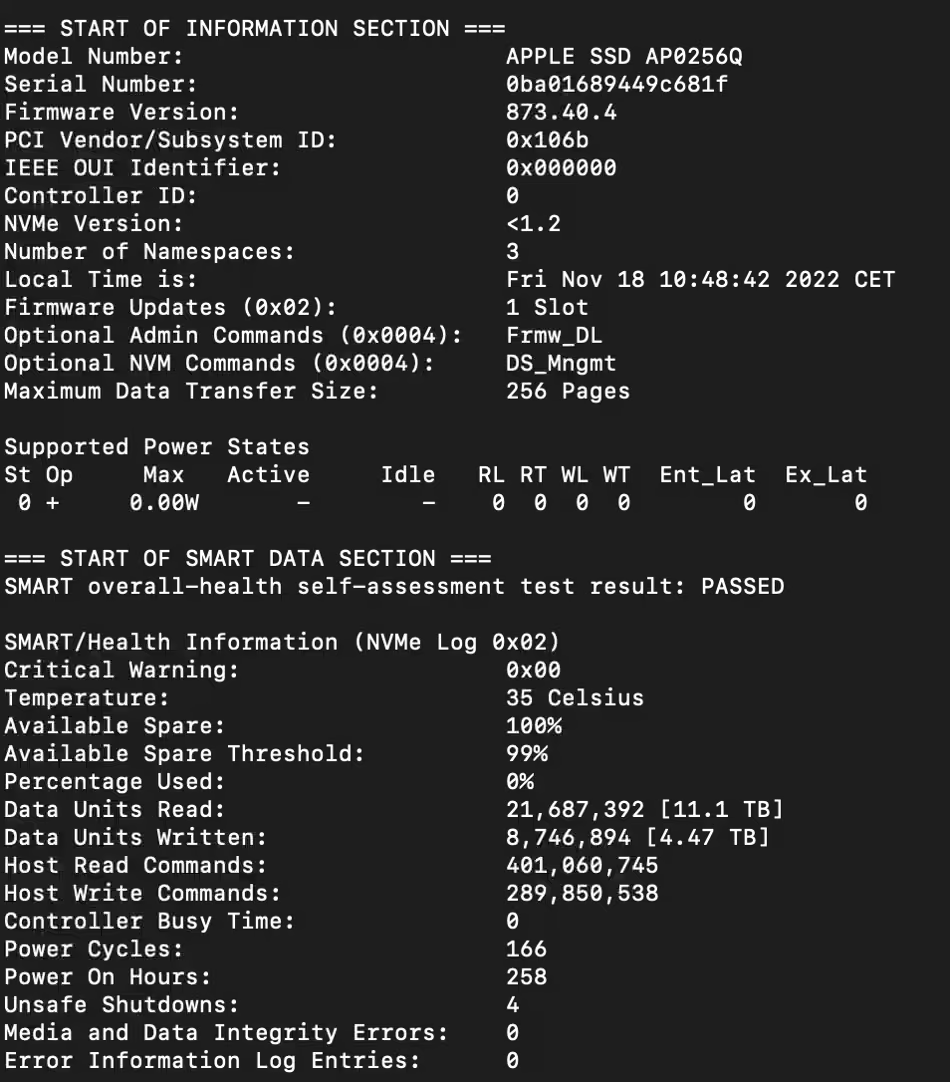
Example of SMART output:
Key parameters:
-
Critical Warning: critical errors in the drive operation. The displayed value determines the nature of the failure
-
Temperature: the current temperature of the drive
-
Available Spare: the current remaining volume of the reserve area used to replace failed memory cells
-
Available Spare Threshold: this is the threshold value for the Available Spare parameter, beyond which the drive's condition is considered critical
-
Percentage Used: the wear level of the drive in a percentage (%). Once this parameter reaches 100%, it means the SSD's life cycle is complete, and its correct operation is no longer guaranteed
-
Data Units Read: the number of data blocks read from the flash memory array (one block corresponds to 512 bytes of data)
-
Data Units Written: the number of data blocks written to the flash memory array (one block corresponds to 512 bytes of data). This parameter is also known as TBW
-
Host Read Commands: the number of read operations performed via the interface (each increment corresponds to 1 MB of data)
-
Host Write Commands: the number of write operations performed via the interface (each increment corresponds to 1 MB of data)
-
Controller Busy Time: the time in minutes that the controller has been busy servicing system requests
-
Power Cycles: the number of power on/off cycles
-
Power On Hours: the total operating time of the drive
-
Unsafe Shutdowns: the number of unsafe power shutdowns
-
Media and Data Integrity Errors: the number of data integrity errors. If the value of this parameter constantly increases, you should prepare to replace the drive
-
Number of Error Information Log Entries: the number of error information log entries. If the value of this parameter constantly increases, you should prepare to replace the drive
Disk Write per Day (DWPD)
DWPD – the permissible rewrites number of full drive volume per day over a specified period (3 or 5 years, depending on the warranty period)
TBW (Total Bytes Written) is the guaranteed total amount of data that can be written to the drive, usually specified in terabytes.
These parameters can be found in the official specifications of the drive. However, most often, SSD manufacturers specify only TBW.
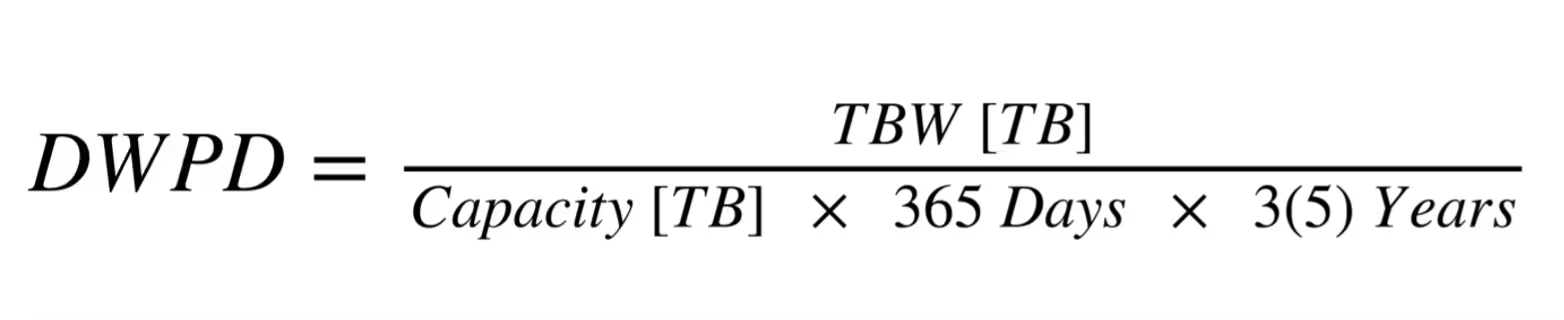
Calculating DWPD
DWPD can be calculated using online calculators or the following formula:
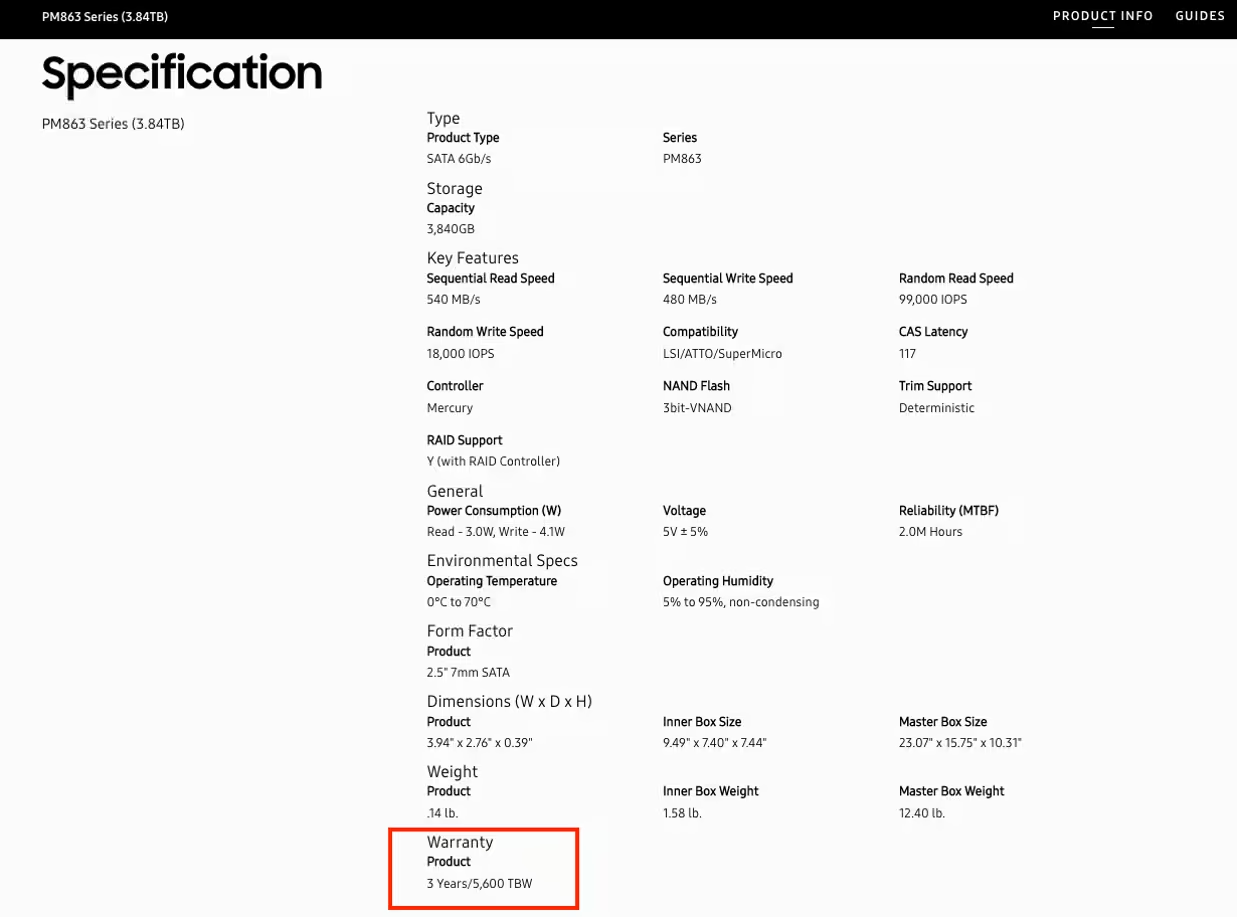
For example, let's calculate DWPD for a 3.84 TB SATA SSD Samsung PM863:
-
TBW: 5600 TB
-
Capacity: 3.84 TB
-
Warranty: 3 years
DWPD = 5600 / (3.84 x 365 x 3) = 5600 / 4204.8 = ~1.33.
This means that for three years, you can write 1.33 x 3.84 TB of data to the drive every day, and the drive will remain functional.
Calculating the exhaustion of drive resources
To determine how much of the drive's resources have been used, we need the Total_LBAs_Written parameter from the drive's SMART data.
Total_LBAs_Written displays the total number of logical blocks (sectors) written to the SSD. The block size is usually 512 bytes, which can be found in the SMART output or the drive's specifications.
To calculate the amount of data written to the drive:
Total_LBAs_Written x block size (512 bytes)
For example, if SMART reports that Total_LBAs_Written is 1361985863706:
Total data written = 1361985863706 x 512 bytes = 697336762217472 bytes = ~634 TB
Now, to determine the extent of drive usage:
Manufacturer's TBW - 100% Total_LBAs_Written x 512 - X%
The formula for calculating the percentage used:
X = (Total_LBAs_Written x 512) x 100 / Manufacturer's TBW
Using our example:
X = 634 TB x 100 / 5600 = ~11.3%
This means the drive has used approximately 11.3% of its total write capacity.
How to get SMART for disks in a dedicated server with a RAID controller
-
To get a list of available disks for checking, use the following command:
smartctl --scan
-
To retrieve SMART data, use the smartctlcommand:
smartctl -d sat+<device_type> -a <device_path>
-
Replace:
-
<device_type> with the appropriate type (e.g., megaraid,0). If the disk type is SATA, then add sat+ before<device_type> value (e.g., sat+megaraid,0)
-
<device_path> with the actual path to the device (e.g., /dev/bus/9)*
*Please note that there is a long-standing bug in smartmontools. Regardless of which device you specify in
/dev/sdX, the utility only considers the disk slot number in megaraid 0 and will display information only for the disk in slot 0, even if you specify
/dev/sda,
/dev/sdb, or
/dev/sdc in the command. More details
here.
If you do not have access to iDRAC but have access from the OS, you can use the useful utility MegaCli. It is designed for working with LSI hardware RAID controllers from the OS and is not suitable for working with software RAID or individual disks.
Suggested Articles
-
-
Dedicated server management