How-to
Table of contents
How to access data in cloud storage
This section covers how to get access credentials and configure clients.
Please note that each cloud storage you create is a separate and independent object storage container. For convenience, the terms "container" and "cloud storage" will be used interchangeably in the following instructions.
Getting access credentials
Access credentials can be found in the customer portal → Cloud Storage → Access credentials section. Please note that each region has its own unique access credentials.
Customer portal
The customer portal features a user-friendly file manager. To use it:
-
In the left-hand menu, navigate to Cloud Storage and select the cloud storage location in the Region field
-
Click the cloud storage entry from the list
In the file manager that opens, you can manage your objects.
Cyberduck
Cyberduck is a popular open-source client for working with object storages (S3, Azure, Swift). It supports various protocols, including FTP, SFTP, WebDAV, Amazon S3, OpenStack Swift, Microsoft Azure, and more. The application is available for Windows and MacOS and can be downloaded for free from the official website.
Cyberduck profile
In the customer portal, you can download a pre-configured Cyberduck profile for a specific location, allowing for quick connection to cloud storage:
-
In the left-hand menu, navigate to Cloud Storage and select the storage location in the Region field
-
In the Access credentials section, click Download, next to Cyberduck profile
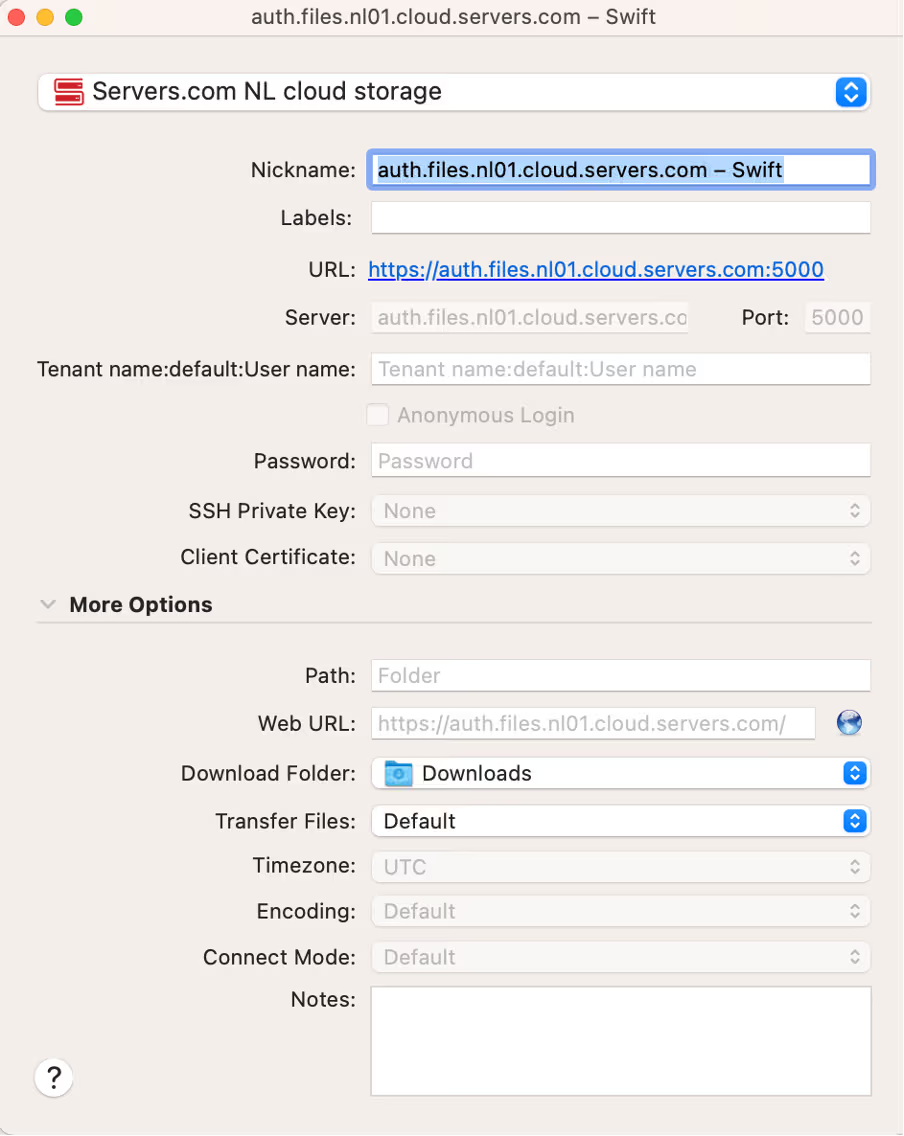
Setting up Cyberduck
-
Open the downloaded profile with the
.cyberduckprofileextension using the Cyberduck application -
Enter the Tenant Name:User name and Password using the access credentials found on the cloud storage page in the customer portal
For example, if the User Name is
12345and the Tenant Name is67890, you would enter67890:default:12345
-
Close the Cyberduck settings window
-
To connect, select the profile from the list and press Enter or right-click the profile and select Connect to Server
The connection to the cloud storage will be established.
FTP
Connecting to cloud storage via FTP allows you to use either the built-in tools of the operating system or third-party applications to upload, download, and manage files directly. However, it is not recommended to use FTP/SFTP protocols for connecting to and managing objects in cloud storage. Learn more here.
The FTP URL with embedded credentials can be found in the customer portal under Cloud Storage → Access credentials section. Click Show next to FTP.
Built-in terminal
MacOS
-
Open Finder → Go → Connect to Server
-
Paste the FTP URL into the Server Address field and click Connect
Windows
-
Open File Explorer by pressing Windows Key + E
-
In the address bar, paste the FTP URL and press Enter
The connection to the cloud storage will be established.
FileZilla
FileZilla is a free, open-source client that supports FTP and SFTP protocols, designed for easy file transfers between a local computer and a server. To connect to cloud storage, follow these steps:
-
Download FileZilla from the official website and launch the application
-
In the Quickconnect bar, enter the following details:
-
Host: paste the part of the FTP URL after the
@symbol -
User: enter Tenant Name.User Name. For example, if the User Name is
12345and the Tenant Name is67890, you should enter67890.12345 -
Password: enter the password for cloud storage
-
Click Quickconnect
The connection to the cloud storage will be established.
File management
How to add a file to cloud storage in the customer portal
Uploading files (objects) to a cloud storage using a user-friendly interface in the customer portal. To add a file, complete the following steps:
-
In the left-hand menu, navigate to Cloud Storage and select the cloud storage location in the Region field
-
Choose the cloud storage from the list
-
Drag and drop files into the File manager area, or click Upload Files and select them from your local computer
The files will be uploaded to your cloud storage.
How restore a deleted file
Using the Undelete option allows you to restore deleted files (objects). To activate this option, complete the following steps:
-
In the left-hand menu, navigate to Cloud Storage and select the cloud storage location in the Region field
-
Choose the cloud storage from the list and click Edit
-
In the Options section, tick the Undelete option
-
Click Save
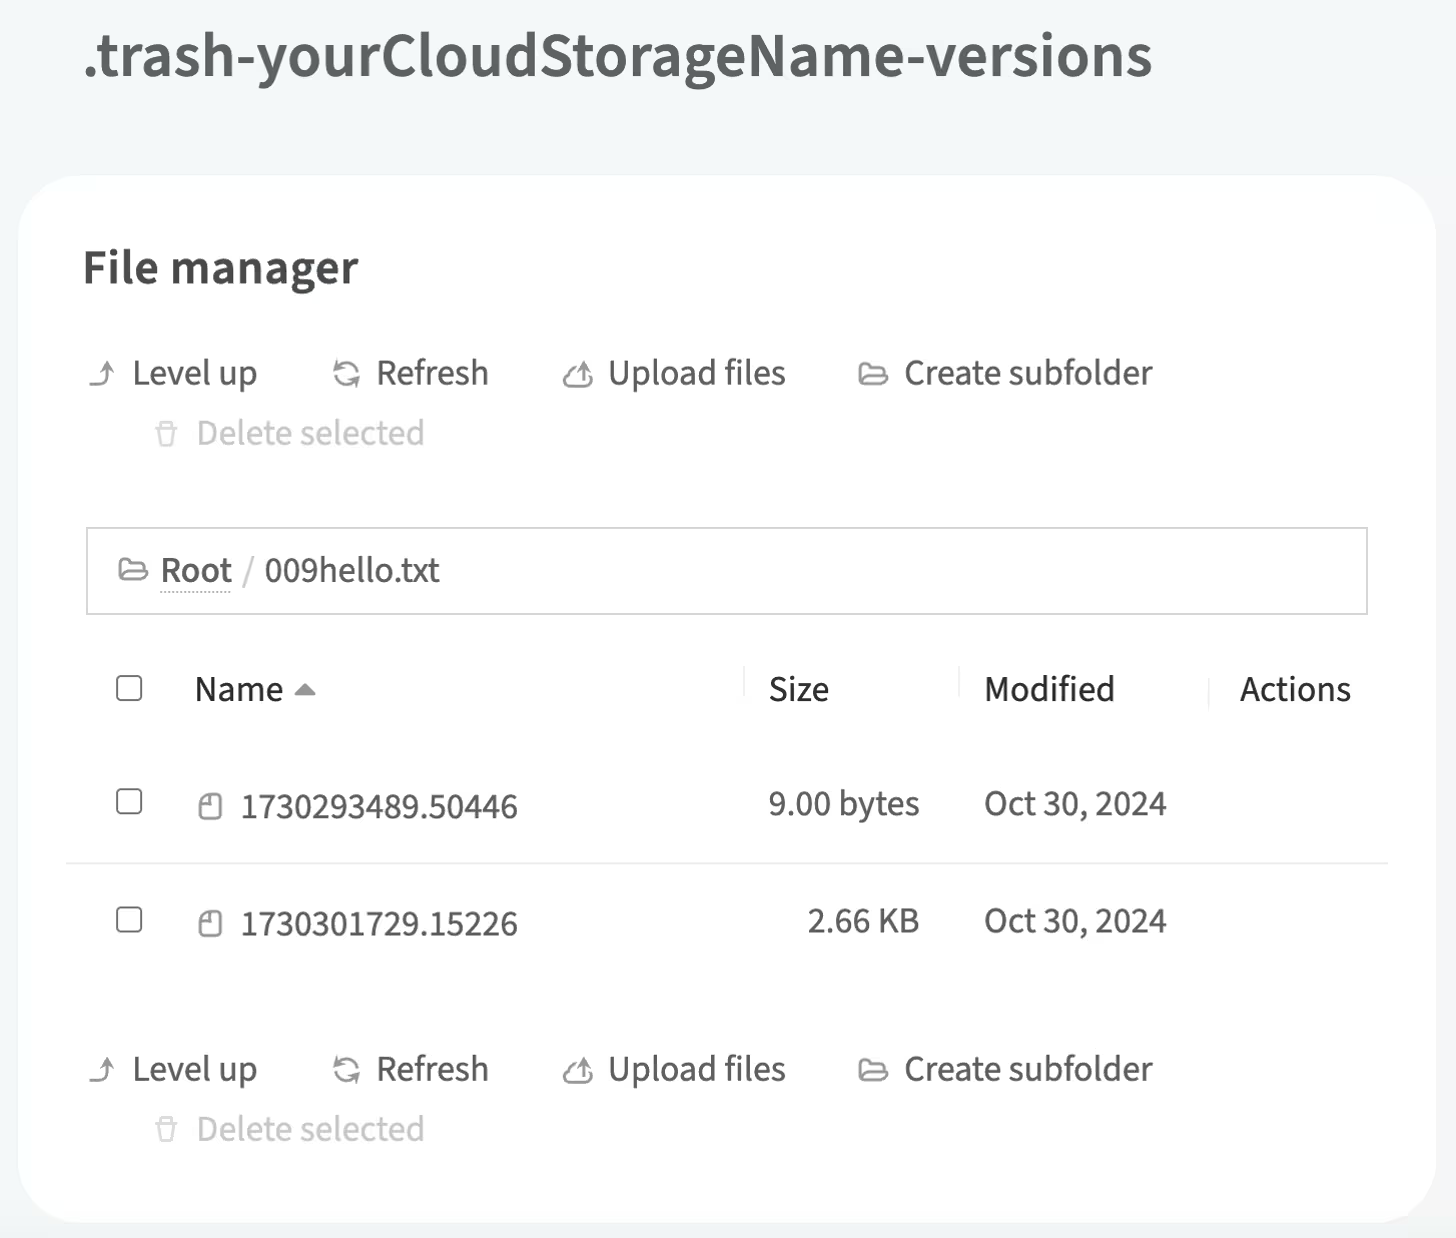
A container named .trash-<yourCloudStorageName> will be created, where deleted files will be stored.
To restore a deleted file, complete the following steps:
-
In the left-hand menu, navigate to Cloud Storage and select the cloud storage location in the Region field
-
Choose the container named
.trash-storage-<yourCloudStorageName>from the list -
Select the file you want to restore and download it to your local computer
-
Return to the list of cloud storages and upload the restored file back to the original cloud storage
The deleted file will be restored.
Service management
How to change the access type of your storage
You can switch the access type of your cloud storages between public and private in the customer portal. To switch the access type, complete the following steps:
-
In the left-hand menu, navigate to Cloud Storage and select the cloud storage location in the Region field
-
Choose the cloud storage from the list and click Edit
-
In the Access Type field, select the type and click Save
The access type of your cloud storage will be updated.
How to synchronize cloud storages
You can synchronize content between cloud storages in different regions, allowing you to maintain data consistency across locations. Ensure you have at least two cloud storages before enabling synchronization.
To proceed, complete the following steps:
-
In the left-hand menu, navigate to Cloud Storage and select the cloud storage location in the Region field
-
Choose the cloud storage from the list
-
Scroll down to the Synchronization section and click Enable Synchronization
-
In the Location to Synchronize field, select the cloud storage location you want to sync with the current one and specify it in the Destination Storage field
-
Click Add Connection if you want to include additional cloud storage to synchronize with the current one
-
Click Apply
The cloud storage synchronization will be applied. To modify synchronization links with other cloud storages, click Change Synchronization.
To cancel synchronization, choose the cloud storage from the list and click Disable Synchronization.
How to enable listing
Enabling listing allows you to display the contents of your cloud storage in HTML format by accessing it via a public URL. By default, listing is disabled, and cloud storage contents are displayed in XML format.
To enable listing, complete the following steps:
-
In the left-hand menu, navigate to Cloud Storage and select the cloud storage location in the Region field
-
Choose the cloud storage from the list and click Edit
-
In the Options section, tick the Listing option
-
In the Listing CSS field that appears, you can specify the relative path to a custom CSS file to apply styles for the listing page
-
Click Save
The listing will be presented in HTML format.
How to enable static pages
Enabling static pages allows you to use an HTML index file instead of the listing page, which will be displayed when accessing the cloud storage via the public URL. Additionally, you can set up custom 404 error page for unsuccessful access attempts.
To enable static page:
-
Create an HTML file (for example,
index.html), then add it to the cloud storage -
In the Options section, tick the Static Pages option
-
In the Index file field, enter the file path and name if it differs from
index.htmlor is not in the cloud storage root -
Click Save
To enable custom error page:
-
Create HTML file named
404error.htmland add it to the root of the cloud storage -
In the Options section, tick the Custom Error Pages option
-
Click Save
Static pages will be displayed when accessing cloud storage via a public link.
How to enable versioning for cloud storage
Enabling versioning for cloud storage allows you to designate a container for storing old versions of modified files.
To enable versioning, complete the following steps:
-
In the left-hand menu, navigate to Cloud Storage and select the cloud storage location in the Region field
-
Choose the cloud storage from the list and click Edit
-
Scroll down to the Versions Storage section and enter the cloud storage name where versions of modified files will be stored. Use the following naming convention:
.trash-<yourCloudStorageName>-versionsFor example, if your cloud storage is named
websitedoc, the versions cloud storage should be named.trash-websitedoc-versions -
Click Save
The versioning for cloud storage will be enabled.
How to attach a domain to cloud storage
Attaching a domain to cloud storage allows you to use a unique, easy-to-remember domain name for accessing the storage (e.g., files.yourcompany.com). Before proceeding, ensure that your main domain is added to the customer portal. For more details, see the article How to Add a Domain.
To attach a domain, complete the following steps:
-
In the customer portal, navigate to your public storage page and scroll down to the Domains section
-
Copy the specified target value from the Domains section, as you will need it to create a CNAME record
-
In the left-hand menu, go to Networks → DNS and select your main domain from the list (e.g.,
com) -
Scroll down to the CNAME Records section and click Add CNAME Record
-
In the window that opens, fill in the following:
-
Alias Domain: specify the subdomain name (e.g.,
files) that will be used before the main domain -
Domain Name: enter the target value obtained from the cloud storage page
-
TTL: leave this field unchanged
-
-
Click Save. The CNAME record will be added
-
Return to your cloud storage page and scroll down to the Domains section
-
Enter the alias domain name created in the previous step (e.g.,
yourcompany.com)
The domain will be attached to your cloud storage within some time.
How to delete cloud storage
Before deleting cloud storage, ensure that all necessary data is backed up. The cloud storage will be removed immediately, and this action is irreversible. To delete the cloud storage, complete the following steps:
-
In the left-hand menu, navigate to Cloud Storage and select the cloud storage location in the Region field
-
Choose the cloud storage from the list
-
Click Edit and ensure that the Undelete option is disabled
-
Click Save
-
Click the trash can icon next to the cloud storage you want to delete
-
Confirm the action by clicking Delete
-
Enter your account password
The cloud storage will be deleted.
OpenStack API
Our cloud storage is accessible via the OpenStack API with v3 (Keystone) authentication. For more details about OpenStack Swift and Keystone, see the documentation:
Getting access credentials for OpenStack API in the customer portal
To retrieve your access credentials, navigate to Cloud Storage and select the desired region. In the Access credentials section, the authorization details will be displayed based on the selected region.
Installing python-openstackclient
python-openstackclient is a command-line tool for managing OpenStack components, including cloud storage, cloud servers, and more.
MacOS
Open the terminal and execute the following command:
pip install python-openstackclientUbuntu
It is recommended to install the client from the Ubuntu repository rather than using pip, while it may provide newer versions with functional differences.
Execute the following command in the cloud server console:
sudo apt-get install python3-openstackclientAuthorization in the OpenStack API using python-openstackclient
To simplify the authorization process and avoid manually entering credentials each time, it is recommended to create a file with environment variables.
-
Create a
.shfile:-
On MacOS, use any text editor to create a file
-
On Ubuntu, use built-in text editor
nanoby executing the following command:nano ~/%file-name -
Replace
%file-name%with the name of the created file
-
-
In the customer portal, go to Cloud Storage → Access Credentials, and click Show next to Shell Variables
-
Copy and paste the environment variables into the created file in the following format:
export OS_AUTH_URL=https://auth.servers.%region_id%.cloud.servers.com:5000/v3/ export OS_TENANT_NAME=XXX export OS_PASSWORD=YYY export OS_USERNAME=ZZZ export OS_IDENTITY_API_VERSION=3 export OS_DEFAULT_DOMAIN_NAME=default export OS_REGION_NAME=%region_name% -
To save the file in the
nanoeditor, use the following shortcuts:-
Press CTRL + O to save
-
Press Enter to confirm
-
Press CTRL + X to exit the editor
-
-
Import the environment variables into the current terminal session by executing the following command:
source ~/%file-name%.sh -
Replace
%file-name%with the name of the created file
Once loaded, the OpenStack client will use these environment variables for authorization.
Checking authorization
To ensure the authorization data has been loaded correctly, execute the following command:
openstack token issueIf successful, the command will output a token.
Useful commands
Get a list of available OpenStack commands:
openstack -hGet a list of containers in the region:
openstack container listGet a list of objects in a container:
openstack object list CONTAINER_NAMEReplace CONTAINER_NAME with the name of the container.
Share
Suggested Articles
- Cloud servers
- Cloud server volumes
- DNS
- Cloud Storage
- Customer Portal
- Dedicated servers
- Firewall
- Forex VPS
- How it works
- Kubernetes clusters
- L2 segments
- Load balancing
- Scalable bare metal
- VPN to GPN